


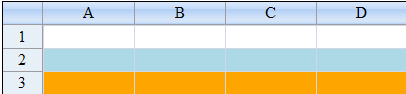
You might want to set up your sheet so that alternating rows have different appearance. For example, in a ledger, alternating rows often have a green background. In Spread, you can set up multiple alternating row appearances, which are applied in sequence, starting with the first row. The following image displays alternating row colors:
Set up the alternating rows using an index into the alternating row appearances. It might help to think of the default row appearance as the first alternating row style (or style zero, because the index is zero-based). Set the other alternating row appearances to subsequent indexes. Refer to the AlternatingRow class.
Return to the row and column appearance overview at Customizing the Appearance of Rows and Columns.
Using a Shortcut
- Set the Count property for the AlternatingRows shortcut object.
- Set the various appearance and other properties of the AlternatingRows shortcut object, such as the BackColor and ForeColor properties.
- Create additional alternating row appearances by setting properties for additional AlternatingRows shortcut objects, increasing the index for each appearance you create.
Example
This example code creates a sheet that has three different appearance settings for rows. The first row uses the default appearance. The second row has a light blue background with dark blue text, and the third row has an orange background with dark red text. This pattern repeats for all subsequent rows.
| C# |  Copy Code Copy Code |
|---|---|
FpSpread1.Sheets[0].AlternatingRows.Count = 3; FpSpread1.Sheets[0].AlternatingRows[1].BackColor = Color.LightBlue; FpSpread1.Sheets[0].AlternatingRows[1].ForeColor = Color.DarkBlue; FpSpread1.Sheets[0].AlternatingRows[2].BackColor = Color.Orange; FpSpread1.Sheets[0].AlternatingRows[2].ForeColor = Color.DarkRed; |
|
| VB | Copy Code |
|---|---|
FpSpread1.Sheets(0).AlternatingRows.Count = 3 FpSpread1.Sheets(0).AlternatingRows(1).BackColor = Color.LightBlue FpSpread1.Sheets(0).AlternatingRows(1).ForeColor = Color.DarkBlue FpSpread1.Sheets(0).AlternatingRows(2).BackColor = Color.Orange FpSpread1.Sheets(0).AlternatingRows(2).ForeColor = Color.DarkRed |
|
Using the Spread Designer
- From the Settings menu, select the AlternatingRow editor icon located under the Other Settings section.
- In the AlternatingRow editor, add the number of alternating row objects you want to provide, using the AltRow section.
- Select the alternating row object for which you want to set properties from the list of row objects.
- Set the properties for the alternating row object in the list of properties.
- Repeat steps 3 and 4 for each alternating row object you want to customize.
- Click OK to close the editor.
- Click Apply and Exit to close the Spread Designer.