


You can use date-time cells to restrict users to entering dates or times and to display data as date or time values.
You determine the format of the date and time to display by specifying the DateTimeFormatInfo object. For a complete list of date and time formats, refer to the DateTimeCellType class.
To create a time cell to display only hours and minutes, set the format string to "hh:mm".
If a date time cell displays dates and times in long date and time format, and the current date and time is "10/29/2002 11:10:01", the Text property returns "Tuesday, October 29, 2002 11:10:01 AM" as the formatted value of the cell. The Value property returns the date-time object.
For details on the properties and methods for this cell type, refer to the DateTimeCellType class.
Return to the overview of editable cell types at Working with Editable Cell Types.
Using Code
- Define the date-time cell type by creating an instance of the DateTimeCellType class.
- Specify the message to display if invalid.
- Specify the format of the date to display.
- Assign the date-time cell type to a cell.
Example
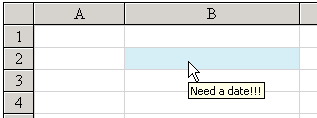
Display the date in the format of Tuesday, March 04 (day of week, month and number of day) in the second row, second column cell. If the user inputs an invalid entry, display a note, as shown in the figure below.
| C# |  Copy Code Copy Code |
|---|---|
FarPoint.Web.Spread.DateTimeCellType datecell = new FarPoint.Web.Spread.DateTimeCellType(); datecell.ErrorMessage = "Need a date!!!"; datecell.FormatString = "dddd, MMMM d"; FpSpread1.ActiveSheetView.Columns[1].Width = 175; FpSpread1.ActiveSheetView.Cells[1, 1].CellType = datecell; |
|
| VB | Copy Code |
|---|---|
Dim datecell As New FarPoint.Web.Spread.DateTimeCellType() datecell.ErrorMessage = "Need a date!!!" datecell.FormatString = "dddd, MMMM d" FpSpread1.ActiveSheetView.Columns(1).Width = 175 FpSpread1.ActiveSheetView.Cells(1, 1).CellType = datecell |
|
Using the Spread Designer
- In the work area, select the cell or cells for which you want to set the cell type.
- Select the Home menu.
- Select the SetCellType icon under the CellType section.
- Select the cell type and any other cell properties.
- Select OK to close the dialog.
- Click Apply and Exit to close the Spread Designer.