


A regular expression cell is a cell that contains a text box that restricts the way data is entered in the cell to valid entries defined in a regular expression.
The Regular Expression cell type expects the data in the cell to be a string. If you are working with other data types, such as date-time, then you need to get the date-time input, convert it to a string for the cell in the Format override, then convert the data back to a date-time in the Parse override.
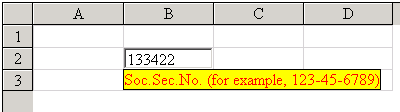
A default error message is displayed if the user types an invalid value and tries to leave the cell.
For details on the properties and methods for this cell type, refer to the RegExpCellType class.
Return to the overview of graphical cell types at Working with Graphical Cell Types.
Using Code
- Define the regular expression cell type by creating an instance of the RegExpCellType class.
- Create a regular expression.
- Create a message to display to the user when expression is not valid.
- Apply the regular expression cell type to a cell or range of cells.
Example
To create a cell that restricts user input to match a regular expression, use this code.
| C# |  Copy Code Copy Code |
|---|---|
FarPoint.Web.Spread.RegExpCellType rgex = new FarPoint.Web.Spread.RegExpCellType(); rgex.ValidationExpression = "^\d{3}-\d{2}-\d{4}$"; rgex.ErrorMessage = "SSN (ex, 123-45-6789)"; FpSpread1.ActiveSheetView.Cells[0, 0].CellType = rgex; |
|
| VB | Copy Code |
|---|---|
Dim rgex As New FarPoint.Web.Spread.RegExpCellType() rgex.ValidationExpression = "^\d{3}-\d{2}-\d{4}$" rgex.ErrorMessage = "SSN (ex, 123-45-6789)" FpSpread1.ActiveSheetView.Cells(0, 0).CellType = rgex |
|
Using the Spread Designer
- In the work area, select the cell or cells for which you want to set the cell type.
- Select the Home menu.
- Select the SetCellType icon under the CellType section.
- Select the cell type and any other cell properties.
- Select OK to close the dialog.
- Click Apply and Exit to close the Spread Designer.