


The Spread for ASP.NET component on your form already has a sheet, ready for you to configure. In this step, you are going to set up the columns and cells in the sheet to resemble a checkbook register.
- Double-click on the form in your project to open the code window.
- Select the line of code
C#  Copy Code
// Put user code to initialize the page here.VB Copy Code'Put user code to initialize the page here.and type the following code to replace it:
C# Copy Codeif (this.IsPostBack) return; // Set up component and rows and columns in sheet. FpSpread1.Height = Unit.Pixel(300); FpSpread1.Width = Unit.Pixel(763); FpSpread1.Sheets[0].ColumnCount = 8; FpSpread1.Sheets[0].RowCount = 100;
VB Copy CodeIf (IsPostBack) Then Return End If ' Set up component and rows and columns in sheet. FpSpread1.Height = Unit.Pixel(300) FpSpread1.Width = Unit.Pixel(763) FpSpread1.Sheets(0).ColumnCount = 8 FpSpread1.Sheets(0).RowCount = 100
This code sets up the component to be 300 pixels high and 763 pixels wide, and the sheet to have 8 columns and 100 rows.
- Now we need to set up the columns to have custom headings. Add the following code below the code you added in Step 2:
C# Copy Code// Add text to column heading. FpSpread1.ColumnHeader.Cells[0, 0].Text = "Check #"; FpSpread1.ColumnHeader.Cells[0, 1].Text = "Date"; FpSpread1.ColumnHeader.Cells[0, 2].Text = "Description"; FpSpread1.ColumnHeader.Cells[0, 3].Text = "Tax?"; FpSpread1.ColumnHeader.Cells[0, 4].Text = "Cleared?"; FpSpread1.ColumnHeader.Cells[0, 5].Text = "Debit"; FpSpread1.ColumnHeader.Cells[0, 6].Text = "Credit"; FpSpread1.ColumnHeader.Cells[0, 7].Text = "Balance";
VB Copy Code' Add text to column heading. FpSpread1.ColumnHeader.Cells(0, 0).Text = "Check #" FpSpread1.ColumnHeader.Cells(0, 1).Text = "Date" FpSpread1.ColumnHeader.Cells(0, 2).Text = "Description" FpSpread1.ColumnHeader.Cells(0, 3).Text = "Tax?" FpSpread1.ColumnHeader.Cells(0, 4).Text = "Cleared?" FpSpread1.ColumnHeader.Cells(0, 5).Text = "Debit" FpSpread1.ColumnHeader.Cells(0, 6).Text = "Credit" FpSpread1.ColumnHeader.Cells(0, 7).Text = "Balance"
- Now set up the column widths to properly display our headings and the data you will add. Add the following code below the code you added in Step 3:
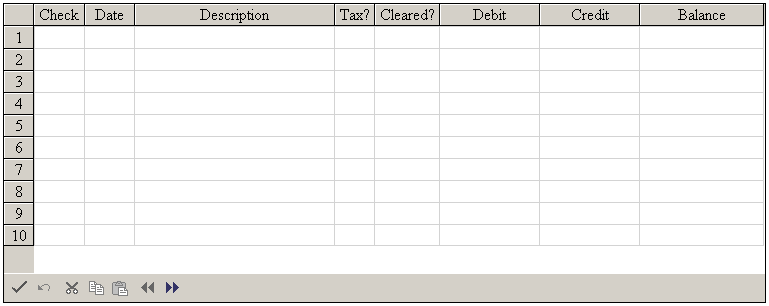
C# Copy Code// Set column widths. FpSpread1.Sheets[0].Columns[0].Width = 50; FpSpread1.Sheets[0].Columns[1].Width = 50; FpSpread1.Sheets[0].Columns[2].Width = 200; FpSpread1.Sheets[0].Columns[3].Width = 40; FpSpread1.Sheets[0].Columns[4].Width = 65; FpSpread1.Sheets[0].Columns[5].Width = 100; FpSpread1.Sheets[0].Columns[6].Width = 100; FpSpread1.Sheets[0].Columns[7].Width = 125;VB Copy Code' Set column widths. FpSpread1.Sheets(0).Columns(0).Width = 50 FpSpread1.Sheets(0).Columns(1).Width = 50 FpSpread1.Sheets(0).Columns(2).Width = 200 FpSpread1.Sheets(0).Columns(3).Width = 40 FpSpread1.Sheets(0).Columns(4).Width = 65 FpSpread1.Sheets(0).Columns(5).Width = 100 FpSpread1.Sheets(0).Columns(6).Width = 100 FpSpread1.Sheets(0).Columns(7).Width = 125 - Save your project, then from the Debug menu choose Start to run your project.
Your ASP.NET page should look similar to the following picture.
Return to the overview of the Tutorial: Creating a Checkbook Register.