


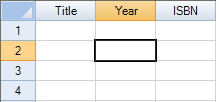
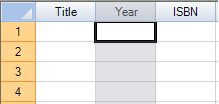
The focus rectangle indicates to the end user the selected and active cell. By default, when a cell is selected the cell has a solid focus rectangle as shown in the figure below. If an entire column (or row) is selected, the first cell in that column (or row) is the cell with the focus rectangle and the column (or row) is highlighted, also as shown. The column and row header of the active cell also have a different background color.
|
|
|
| Focus indicator for selected individual cell | Focus indicator for selected column |
You can customize the focus indicator for the active cell by using the FocusRenderer property of the Spread component (which uses the IFocusIndicatorRenderer interface). For animated indicators, you need the IAnimatedFocusRenderer interface. You can also change the selected background color of the active cell headers.
This table summarized the types of focus indicators and the classes that correspond to them.
|
Type |
Class |
|---|---|
|
Default |
|
|
Animated |
|
|
Custom Line |
|
| Editing | |
| Enhanced | |
|
Image |
|
|
Marquee Line |
|
|
Solid Line |
The DefaultFocusIndicatorRenderer is the base class for the others. The ImageFocusIndicatorRenderer allows you to use an image as the focus indicator. The SolidFocusIndicatorRenderer allows you to customize a solid border around the selected cell as a focus indicator.
In the Spread Designer, you can customize the focus indicator with the Focus Indicator Editor. For more information about using the Spread Designer, refer to the Focus Indicator Editor topic in the Spread Designer Guide.
Return to Using Edit Mode and Focus.
Using Code
Use the IFocusIndicatorRenderer interface to create custom indicators for the active cell.
Example
This example creates a custom focus indicator for the active cell.
| C# |  Copy Code Copy Code |
|---|---|
FarPoint.Win.Spread.SolidFocusIndicatorRenderer sfir =new FarPoint.Win.Spread.SolidFocusIndicatorRenderer(Color.Blue, 2); fpSpread1.FocusRenderer = sfir; // Create a custom indicator. public class MyIndicator : FarPoint.Win.Spread.IFocusIndicatorRenderer { public void Paint(System.Drawing.Graphics g, int x, int y, int width, int height, bool left, bool top, bool right, bool bottom) { SolidBrush r = new SolidBrush(System.Drawing.Color.Red); SolidBrush b = new SolidBrush(System.Drawing.Color.Blue); SolidBrush gr = new SolidBrush(System.Drawing.Color.DarkGreen); g.FillRectangle(r, x, y, 1, height); g.FillRectangle(gr, x, y, width, 1); g.FillRectangle(r, x + width - 1, y, 1, height); g.FillRectangle(b, x, y + height - 1, width, 1); } } fpSpread1.FocusRenderer = new MyIndicator(); |
|
| VB | Copy Code |
|---|---|
Dim sfir As New FarPoint.Win.Spread.SolidFocusIndicatorRenderer(Color.Blue, 2) FpSpread1.FocusRenderer = sfir ' Create a custom indicator Public Class MyIndicator Implements FarPoint.Win.Spread.IFocusIndicatorRenderer Public Sub Paint(ByVal g As System.Drawing.Graphics, ByVal x As Integer, ByVal y As Integer, ByVal width As Integer, ByVal height As Integer, ByVal left As Boolean, ByVal top As Boolean, ByVal right As Boolean, ByVal bottom As Boolean) Implements FarPoint.Win.Spread.IFocusIndicatorRenderer.Paint Dim r As New SolidBrush(Color.Red) Dim b As New SolidBrush(Color.Blue) Dim gr As New SolidBrush(Color.DarkGreen) g.FillRectangle(r, x, y, 1, height) g.FillRectangle(gr, x, y, width, 1) g.FillRectangle(r, x + width - 1, y, 1, height) g.FillRectangle(b, x, y + height - 1, width, 1) End Sub End Class FpSpread1.FocusRenderer = New MyIndicator() |
|
Using the Spread Designer
- Select the Format menu option.
- Choose the Focus Indicator Editor... menu.
- Make changes to the dialog and select OK.
Using Code
Use the SelectedBackgroundColor property of the EnhancedColumnHeaderRenderer (or row) to set the header backcolor of the active cell.
Example
This example changes the header background color for the active cell.
| C# | Copy Code |
|---|---|
FarPoint.Win.Spread.CellType.EnhancedColumnHeaderRenderer testing = new FarPoint.Win.Spread.CellType.EnhancedColumnHeaderRenderer(); testing.SelectedBackgroundColor = Color.MediumTurquoise; FarPoint.Win.Spread.CellType.EnhancedRowHeaderRenderer testing1 = new FarPoint.Win.Spread.CellType.EnhancedRowHeaderRenderer(); testing1.SelectedBackgroundColor = Color.MediumTurquoise; fpSpread1.Sheets[0].ColumnHeader.DefaultStyle.Renderer = testing; fpSpread1.Sheets[0].RowHeader.DefaultStyle.Renderer = testing1; |
|
| VB | Copy Code |
|---|---|
Dim testing as New FarPoint.Win.Spread.CellType.EnhancedColumnHeaderRenderer testing.SelectedBackgroundColor = Color.MediumTurquoise Dim testing1 as New FarPoint.Win.Spread.CellType.EnhancedRowHeaderRenderer testing1.SelectedBackgroundColor = Color.MediumTurquoise FpSpread1.Sheets(0).ColumnHeader.DefaultStyle.Renderer = testing FpSpread1.Sheets(0).RowHeader.DefaultStyle.Renderer = testing1 |
|