


You can show a graphic image in a cell using the image cell type. An image cell shows an image as data. If the data type for a bound column is a bit array then the default cell type for that bound column would be an image cell type.
An image object can be assigned to the Value property of a cell. The image or serialized image object must be in the data model.
To create a cell that contains an image, use the ImageCellType class. Create an image cell using the following procedure. The result is shown in this figure.
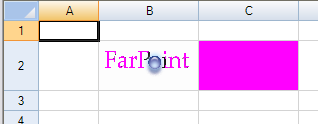
Notice that both cells have a magenta background, but the one with the image only shows the magenta through the transparent areas specified by the transparency color property and the transparency tolerance property. The image is mostly white so blocks out most of the magenta, but the lettering that is black shows the magenta. The lettering that is more blue (near the blue ball) is beyond the tolerance and so is not transparent. When you set a transparency color, the background behind the picture shows through in the area that originally had the color you specify. Setting the transparency tolerance to 255 will cause everything to be transparent so you may wish to use a value less than 255.
See Also
For more information on the properties and methods of this cell type, refer to the ImageCellType class.
For more information on other graphical cell types, refer to Working with Graphical Cell Types.
Using the Properties Window
- At design time, in the Properties window, select the Spread component.
- Select the Sheets property.
- Click the button to display the SheetView Collection Editor.
- In the Members list, select the sheet in which the cells appear.
- In the property list, select the Cells property and then click the button to display the Cell, Column, and Row Editor.
- Select the cells for which you want to set the cell type.
- In the property list, select the CellType property and choose the Image cell type.
- Expand the list of properties under the CellType property. Select and set these specific properties as needed.
- Click OK to close the Cell, Column, and Row Editor.
- Click OK to close the SheetView Collection Editor.
Using Code
- Define the image cell by creating an instance of the ImageCellType class.
- Create the image.
- Specify what appears in the cell by setting the Value property for the ImageCellType object.
- Specify the appearance of the image by setting properties such as Style.
- Assign the image cell type to a cell or range of cells by setting the CellType property for a cell, column, row, or style to the ImageCellType object.
Example
This example sets the properties of an image cell type then loads a logo image into a cell using the Value property. With background color set, the use of transparency can be seen.
| C# |  Copy Code Copy Code |
|---|---|
FarPoint.Win.Spread.CellType.ImageCellType imgct = new FarPoint.Win.Spread.CellType.ImageCellType(); System.Drawing.Image image = System.Drawing.Image.FromFile("D:\\Logos\\logo.jpg"); imgct.Style = FarPoint.Win.RenderStyle.Stretch; imgct.TransparencyColor = Color.Black; imgct.TransparencyTolerance = 20; fpSpread1.Sheets[0].Cells[1,1,1,2].BackColor = Color.Magenta; fpSpread1.Sheets[0].Columns[1,2].Width = 100; fpSpread1.Sheets[0].Rows[1,1].Height = 50; fpSpread1.Sheets[0].Cells[1,1,2,2].CellType = imgct; fpSpread1.Sheets[0].Cells[1,1].Value = image; |
|
| VB | Copy Code |
|---|---|
Dim imgct As New FarPoint.Win.Spread.CellType.ImageCellType() Dim image As System.Drawing.Image = System.Drawing.Image.FromFile("D:\Logos\logo.jpg") imgct.Style = FarPoint.Win.RenderStyle.Stretch imgct.TransparencyColor = Color.Black imgct.TransparencyTolerance = 20 FpSpread1.Sheets(0).Cells(1,1,1,2).BackColor = Color.Magenta FpSpread1.Sheets(0).Columns(1,2).Width =100 FpSpread1.Sheets(0).Rows(1,1).Height = 50 FpSpread1.Sheets(0).Cells(1,1,2,2).CellType = imgct FpSpread1.Sheets(0).Cells(1, 1).Value = image |
|
Using the Spread Designer
- Select the cell or cells in the work area.
- In the property list, in the Misc category, select CellType. From the drop-down list, choose the Image cell type. Now expand the CellType property and various properties are available that are specific to this cell type. Select and set those properties as needed.
Or right-click on the cell or cells and select Cell Type. From the list, select Image. In the CellType editor, set the properties you need. Click Apply.
- From the File menu choose Apply and Exit to apply your changes to the component and exit Spread Designer.