


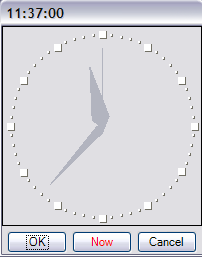
If you press F4 or double-click a date-time cell when it is in edit mode, a pop-up calendar (or pop-up clock) appears. The calendar control appears if you have the date-time cell set to any format besides TimeOnly format. The clock control appears if you have the format set to TimeOnly. The date you choose from the calendar (or the time you choose from the clock) is placed in the date-time cell. If you want the present date and time, in the calendar control click Today; if you want the present time, in the clock control click Now.
| Pop-Up Calendar Control | Pop-Up Clock Control |
|---|---|
|
|
|
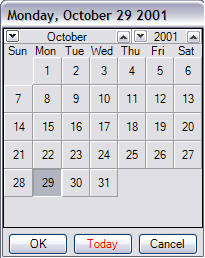
You can specify normal and abbreviated day names, normal and abbreviated month names, and the text for the buttons at the bottom of the control. Use the SetCalendarText method of the DateTimeCellType class to set these.
Note that the text appears centered on the button. Try to limit your text to eight or nine characters in length. The button will display ten characters, but the first and last appear very close to the edges.
When using the controls, only clicking on the OK or Cancel buttons closes the control. The Today (or Now) button simply sets the value in the cell to the current date (or time).
For more information on setting the format of the date-time cell, refer to the DateTimeFormat enumeration.
For information on the editable cell types, refer to Working with Editable Cell Types.
For information on other features of cell types, refer to Understanding Additional Features of Cell Types.
Using Code
- Define the date-time cell by creating an instance of the DateTimeCellType class.
- Specify the values for the buttons or for all the names and the buttons.
- Assign the date-time cell type to a cell or range of cells by setting the CellType property for a cell, column, row, or style to the DateTimeCellType object.
Example
Set the text of the buttons and specify day and month names in array lists.
| C# |  Copy Code Copy Code |
|---|---|
FarPoint.Win.Spread.CellType.DateTimeCellType datecell = new FarPoint.Win.Spread.CellType.DateTimeCellType(); string[] daynames = {"Sunday", "Monday", "Tuesday", "Wednesday", "Thursday", "Friday", "Saturday"}; string[] months = {"January", "February", "March", "April", "May", "June", "July", "August", "September", "October", "November", "December"}; string[] dayabbrev = {"Su","My","Ty","Wy","Th","Fy","Sy"}; string[] mthabbrev = {"Jy","Fy","Mh","Al","My","Jn","Jl","At","Sr","Or","Nr","Dr"}; string okbuttn = "Fine"; string cancelb = "Quit"; datecell.DateTimeFormat = FarPoint.Win.Spread.CellType.DateTimeFormat.UserDefined; datecell.UserDefinedFormat = "dddd MMMM d, yyyy"; datecell.SetCalendarText(daynames,months,dayabbrev,mthabbrev,okbuttn, cancelb); fpSpread1.ActiveSheet.Cells[1, 1].CellType = datecell; fpSpread1.ActiveSheet.Cells[1, 1].Value = System.DateTime.Now; fpSpread1.ActiveSheet.Columns[1].Width = 130; |
|
| VB | Copy Code |
|---|---|
Dim datecell As New FarPoint.Win.Spread.CellType.DateTimeCellType()Dim daynames() As String = {"Sunday", "Monday", "Tuesday", "Wednesday", "Thursday", "Friday", "Saturday" }Dim months() As String = {"January", "February", "March", "April", "May", "June", "July", "August", "September", "October", "November", "December"}Dim dayabbrev() As String = {"Su","My","Ty","Wy","Th","Fy","Sy"}Dim mthabbrev() As String = {"Jy","Fy","Mh","Al","My","Jn","Jl","At","Sr","Or","Nr","Dr"}Dim okbuttn As String = "Fine"Dim cancelb As String = "Quit" datecell.DateTimeFormat = FarPoint.Win.Spread.CellType.DateTimeFormat.UserDefined datecell.UserDefinedFormat = "dddd MMMM d, yyyy" datecell.SetCalendarText(daynames,months,dayabbrev,mthabbrev,okbuttn, cancelb) FpSpread1.ActiveSheet.Cells(1, 1).CellType = datecell FpSpread1.ActiveSheet.Cells(1, 1).Value = System.DateTime.Now FpSpread1.ActiveSheet.Columns(1).Width = 130 |
|
Using the Spread Designer
- Select the cell or cells in the work area.
- In the property list, in the Misc category, select CellType. From the drop-down list, choose the cell type. Now expand the CellType property and various properties are available that are specific to this cell type. Select and set those properties as needed.
Or right-click on the cell or cells and select Cell Type. From the list, select the cell type. In the CellType editor, set the properties you need. Click Apply.
- From the File menu choose Apply and Exit to apply your changes to the component and exit Spread Designer.