


A slider cell displays a slider control in the cell.
To create a cell that acts like a slider, use the SliderCellType class and follow the procedure described in this topic.
Customizing the Slider
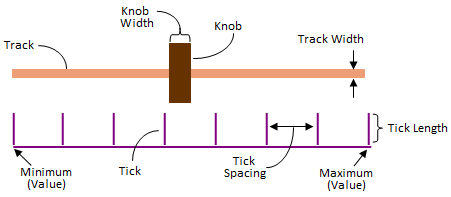
The parts of the slider (corresponding to their property names) are shown here. For this example, the orientation is horizontal and solid colors are used (as opposed to pictures).
You can customize the display and operation of the slider in the cell by setting the following properties.
|
Property |
Customization |
|---|---|
|
BackgroundImage |
Set the background image for the cell. |
|
ChangeOnFocus |
Set whether the slider moves with the initial click. |
|
KnobColor |
Set the color of the slider knob. |
|
KnobPicture |
Customize the slider knob image. |
|
KnobWidth |
Set the width (in pixels) of the slider knob. |
|
Maximum |
Set the maximum value for user entry. |
|
Minimum |
Set the minimum value for user entry. |
|
Orientation |
Set the orientation of the slider. |
|
TickColor |
Set the color of the slider tick mark. |
|
TickLength |
Set the size of the slider tick mark. |
|
TickSpacing |
Set how frequently to space the tick marks. |
|
TrackColor |
Set the color of the slider track. |
|
TrackPicture |
Customize the image for the slider track. |
|
TrackWidth |
Set the width (in pixels) of the slider track. |
See Also
Note that some graphical elements in certain cell types are affected by XP themes (visual styles). Setting the VisualStyles property of the Spread component to "off" can allow visual customizations of those graphical cell types to work as expected. For more information, refer to Using XP Themes with the Component.
For more information on the properties and methods of this cell type, refer to the SliderCellType class.
For more information on other graphical cell types, refer to Working with Graphical Cell Types.
Using the Properties Window
- At design time, in the Properties window, select the Spread component.
- Select the Sheets property.
- Click the button to display the SheetView Collection Editor.
- In the Members list, select the sheet in which the cells appear.
- In the property list, select the Cells property and then click the button to display the Cell, Column, and Row Editor.
- Select the cells for which you want to set the cell type.
- In the property list, select the CellType property and choose the Slider cell type.
- Expand the list of properties under the CellType property. Select and set these specific properties as needed.
- Click OK to close the Cell, Column, and Row Editor.
- Click OK to close the SheetView Collection Editor.
Using Code
- Define the slider cell by creating an instance of the SliderCellType class.
- Format and specify the appearance of the slider.
- Assign the slider cell type to a cell or range of cells by setting the CellType property for a cell, column, row, or style to the SliderCellType object.
Example
| C# |  Copy Code Copy Code |
|---|---|
fpSpread1.ActiveSheet.Columns[1].Width = 250; fpSpread1.ActiveSheet.Rows[1].Height = 150; fpSpread1.VisualStyles = FarPoint.Win.VisualStyles.Off; FarPoint.Win.Spread.CellType.SliderCellType slider = new FarPoint.Win.Spread.CellType.SliderCellType(); slider.BackgroundImage = new FarPoint.Win.Picture(Image.FromFile("C:\\images\\scene.jpg")); slider.ChangeOnFocus = true; slider.KnobColor = Color.Red; // Or if you want to use an image instead of a solid color: // slider.KnobPicture = new FarPoint.Win.Picture(Image.FromFile("..\\images\\brush.gif")); slider.KnobWidth = 10; slider.Maximum = 200; slider.Minimum = 0; slider.Orientation = FarPoint.Win.SliderOrientation.Horizontal; slider.TickColor = Color.DarkBlue; slider.TickLength = 5; slider.TickSpacing = 20; slider.TrackColor = Color.Green; // Or if you want to use an image instead of a solid color: // slider.TrackPicture = new FarPoint.Win.Picture(Image.FromFile("..\\images\\pattern.jpg")); slider.TrackWidth = 10; fpSpread1.ActiveSheet.Cells[1, 1].CellType = slider; |
|
| VB | Copy Code |
|---|---|
FpSpread1.ActiveSheet.Columns(1).Width = 250 FpSpread1.ActiveSheet.Rows(1).Height = 150 FpSpread1.VisualStyles = FarPoint.Win.VisualStyles.Off Dim slider As New FarPoint.Win.Spread.CellType.SliderCellType() slider.BackgroundImage = New FarPoint.Win.Picture(Image.FromFile("C:\\images\\scene.jpg")) slider.ChangeOnFocus = True slider.KnobColor = Color.Red ‘ Or if you want to use an image instead of a solid color: ‘ slider.KnobPicture = New FarPoint.Win.Picture(Image.FromFile("..\\images\\brush.gif")) slider.KnobWidth = 10 slider.Maximum = 200 slider.Minimum = 0 slider.Orientation = FarPoint.Win.SliderOrientation.Horizontal slider.TickColor = Color.DarkBlue slider.TickLength = 5 slider.TickSpacing = 20 slider.TrackColor = Color.Green ‘ Or if you want to use an image instead of a solid color: ‘ slider.TrackPicture = New FarPoint.Win.Picture(Image.FromFile("..\\images\\pattern.jpg")) slider.TrackWidth = 10 FpSpread1.ActiveSheet.Cells(1, 1).CellType = slider |
|
Using the Spread Designer
- Select the cell or cells in the work area.
- In the property list, in the Misc category, select CellType. From the drop-down list, choose the Slider cell type. Now expand the CellType property and various properties are available that are specific to this cell type. Select and set those properties as needed.
Or right-click on the cell or cells and select Cell Type. From the list, select Slider. In the CellType editor, set the properties you need. Click Apply.
- From the File menu choose Apply and Exit to apply your changes to the component and exit Spread Designer.