


To set cell types, for each custom cell type, you have to create a cell type object, set the properties for it, and then assign that object to the CellType property for a cell or range of cells.
Set the cell type for the Check # column by adding the following code below the code you have already added:
Example
| C# |  Copy Code Copy Code |
|---|---|
// Create Check # column of number cells. FarPoint.Win.Spread.CellType.NumberCellType objNumCell = new FarPoint.Win.Spread.CellType.NumberCellType(); objNumCell.DecimalPlaces = 0; objNumCell.MinimumValue = 1; objNumCell.MaximumValue = 9999; objNumCell.ShowSeparator = false; fpSpread1.Sheets[0].Columns[0].CellType = objNumCell; |
|
| VB | Copy Code |
|---|---|
' Create Check # column of number cells. Dim objNumCell As New FarPoint.Win.Spread.CellType.NumberCellType() objNumCell.DecimalPlaces = 0 objNumCell.MinimumValue = 1 objNumCell.MaximumValue = 9999 objNumCell.ShowSeparator = False FpSpread1.Sheets(0).Columns(0).CellType = objNumCell |
|
Set the cell type for the Date column by adding the following code below the code you have already added:
Example
| C# | Copy Code |
|---|---|
// Create Date column of date-time cells. FarPoint.Win.Spread.CellType.DateTimeCellType objDateCell = new FarPoint.Win.Spread.CellType.DateTimeCellType(); objDateCell.DateTimeFormat = FarPoint.Win.Spread.CellType.DateTimeFormat.ShortDate; fpSpread1.Sheets[0].Columns[1].CellType = objDateCell; |
|
| VB | Copy Code |
|---|---|
' Create Date column of date-time cells. Dim objDateCell As New FarPoint.Win.Spread.CellType.DateTimeCellType() objDateCell.DateTimeFormat = FarPoint.Win.Spread.CellType.DateTimeFormat.ShortDate FpSpread1.Sheets(0).Columns(1).CellType = objDateCell |
|
Set the cell type for the Description column by adding the following code below the code you have already added:
Example
| C# | Copy Code |
|---|---|
// Create Description column of text cells. FarPoint.Win.Spread.CellType.TextCellType objTextCell = new FarPoint.Win.Spread.CellType.TextCellType(); objTextCell.MaxLength = 100; fpSpread1.Sheets[0].Columns[2].CellType = objTextCell; |
|
| VB | Copy Code |
|---|---|
' Create Description column of text cells. Dim objTextCell As New FarPoint.Win.Spread.CellType.TextCellType() objTextCell.MaxLength = 100 FpSpread1.Sheets(0).Columns(2).CellType = objTextCell |
|
Set the cell type for the Tax? and Cleared? columns by adding the following code below the code you have already added:
Example
| C# | Copy Code |
|---|---|
/// Create Tax? and Cleared? columns of check box cells. FarPoint.Win.Spread.CellType.CheckBoxCellType objCheckCell = new FarPoint.Win.Spread.CellType.CheckBoxCellType(); objCheckCell.ThreeState = false; fpSpread1.Sheets[0].Columns[3].CellType = objCheckCell; fpSpread1.Sheets[0].Columns[4].CellType = objCheckCell; |
|
| VB | Copy Code |
|---|---|
' Create Tax? and Cleared? columns of check box cells. Dim objCheckCell As New FarPoint.Win.Spread.CellType.CheckBoxCellType() objCheckCell.ThreeState = False FpSpread1.Sheets(0).Columns(3).CellType = objCheckCell FpSpread1.Sheets(0).Columns(4).CellType = objCheckCell |
|
Set the cell type for the Debit, Credit, and Balance columns by adding the following code below the code you have already added:
Example
| C# | Copy Code |
|---|---|
// Create the Debit, Credit, and Balance columns of currency cells. FarPoint.Win.Spread.CellType.CurrencyCellType objCurrCell = new FarPoint.Win.Spread.CellType.CurrencyCellType(); objCurrCell.LeadingZero = FarPoint.Win.Spread.CellType.LeadingZero.Yes; objCurrCell.NegativeRed = true; objCurrCell.FixedPoint = true; fpSpread1.Sheets[0].Columns[5].CellType = objCurrCell; fpSpread1.Sheets[0].Columns[6].CellType = objCurrCell; fpSpread1.Sheets[0].Columns[7].CellType = objCurrCell; |
|
| VB | Copy Code |
|---|---|
' Create the Debit, Credit, and Balance columns of currency cells. Dim objCurrCell As New FarPoint.Win.Spread.CellType.CurrencyCellType() objCurrCell.LeadingZero = FarPoint.Win.Spread.CellType.LeadingZero.Yes objCurrCell.NegativeRed = True objCurrCell.FixedPoint = True FpSpread1.Sheets(0).Columns(5).CellType = objCurrCell FpSpread1.Sheets(0).Columns(6).CellType = objCurrCell FpSpread1.Sheets(0).Columns(7).CellType = objCurrCell |
|
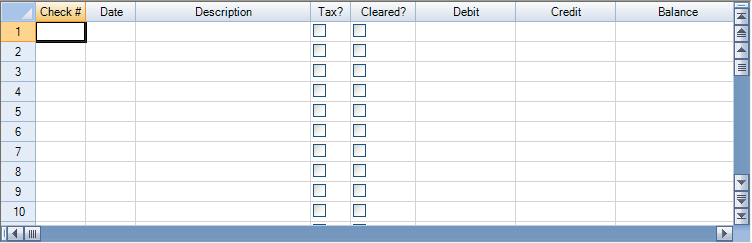
Save your project, then from the Debug menu choose Start to run your project.
Your form should look similar to the following picture.
Return to the list of steps for Tutorial: Creating a Checkbook Register.