


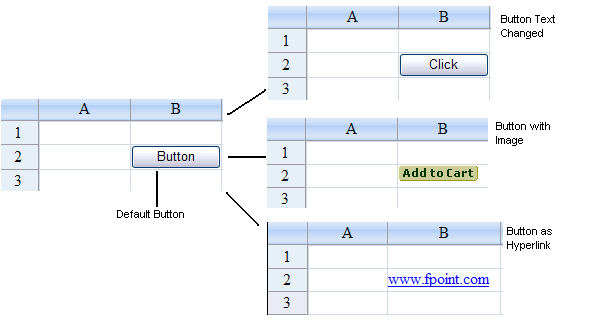
A button cell displays a rectangular button (with the word Button by default unless you specify otherwise) that behaves like a button control. You can specify the text for that button or you can substitute the entire graphic image. You can also specify text to appear underlined and blue, as a hypertext link would appear. The default appearance and the three possible alternatives are shown in this figure.
To create a cell that acts like a button, follow this procedure.
For details on the properties and methods for this cell type, refer to the ButtonCellType class in the Assembly Reference.
Using Code
- Define the button cell type by creating an instance of the ButtonCellType class and specify whether it is push button, image button, or link button.
- Specify the properties of the button by setting the properties of that instance. Specify the text in the button or an image to use.
- Specify the command to execute when the button is selected.
- Assign the type to a cell (or cells).
- Use the ButtonCommand event to respond to the selected button.
Example
In this example, create a button with text in the first cell, a button with a stored image in the cell diagonally below that, and a button with link text in the one diagonally below that. These are identical to those pictured in the figure (except for placement). Use the ButtonCommand event to respond to the selected button.
| C# |  Copy Code Copy Code |
|---|---|
FpSpread1.ActiveSheetView.Cells[0, 0].CellType = new FarPoint.Web.Spread.ButtonCellType("OneCommand", FarPoint.Web.Spread.ButtonType.PushButton, "Click"); FpSpread1.ActiveSheetView.Cells[1, 1].CellType = new FarPoint.Web.Spread.ButtonCellType("OneCommand", FarPoint.Web.Spread.ButtonType.ImageButton, "images/addtocart.gif"); FpSpread1.ActiveSheetView.Cells[2, 2].CellType = new FarPoint.Web.Spread.ButtonCellType("OneCommand", FarPoint.Web.Spread.ButtonType.LinkButton, www.fpoint.com); protected void FpSpread1_ButtonCommand(object sender, FarPoint.Web.Spread.SpreadCommandEventArgs e) { System.Drawing.Point p; p = (System.Drawing.Point)e.CommandArgument; TextBox1.Text = "You clicked the button in row " + p.X + " , column " + p.Y; } |
|
| VB | Copy Code |
|---|---|
Dim btnc1 As New FarPoint.Web.Spread.ButtonCellType() btnc1.CommandName = "OneCommand" btnc1.ButtonType = FarPoint.Web.Spread.ButtonType.PushButton btnc1.Text = "Click" FpSpread1.ActiveSheetView.Cells(0, 0).CellType = btnc1 Dim btnc2 As New FarPoint.Web.Spread.ButtonCellType() btnc2.CommandName = "OneCommand" btnc2.ButtonType = FarPoint.Web.Spread.ButtonType.ImageButton btnc2.ImageUrl = "addtocart.gif" FpSpread1.ActiveSheetView.Cells(1, 1).CellType = btnc2 Dim btnc3 As New FarPoint.Web.Spread.ButtonCellType() btnc3.CommandName = "OneCommand" btnc3.ButtonType = FarPoint.Web.Spread.ButtonType.LinkButton btnc3.Text = "www.fpoint.com" FpSpread1.ActiveSheetView.Cells(2, 2).CellType = btnc3 Private Sub FpSpread1ButtonCommand(ByVal sender As Object, ByVal e As FarPoint.Web.Spread.SpreadCommandEventArgs) Handles FpSpread1.ButtonCommand TextBox1.Text = "You clicked the button in row " & e.CommandArgument.X & " , column " & e.CommandArgument.Y End Sub |
|
Using the Spread Designer
- In the work area, select the cell or cells for which you want to set the cell type.
- Select the Home menu.
- Select the SetCellType icon under the CellType section.
- Select the cell type and any other cell properties.
- Select OK to close the dialog.
- Click Apply and Exit to close the Spread Designer.