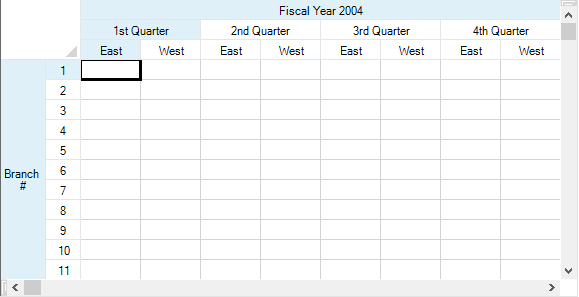
You can provide multiple rows in the column header and multiple columns in the row header. As shown in the following figure, the headers may have different numbers of columns and rows.

The rows or columns in the header can also contain spans, for example, if you want to have a header cell that explains two cells beneath it (or subheaders). For instructions for creating a span in a header, see Creating a Span in a Header.
You can customize the labels in these headers. For instructions for customizing the labels, see Customizing Header Label Text.
For more information on the individual properties, refer to the Column Label property or the Row Label property.
Using the Properties Window
- At design time, in the Properties window, select the Spread component.
- Select the Sheets property.
- Click the button to display the SheetView Collection Editor.
- Click the sheet for which you want to change the header display.
- Set the ColumnHeaderRowCount property to the number or rows you want in the column header or the RowHeaderColumnCount property to the number of columns you want in the row header.
- Click OK to close the editor.
Using a Shortcut
Set the ColumnHeaderRowCount property or the RowHeaderColumnCount property for a Sheets object. Use the AddColumnHeaderSpanCell method to span the cells in the header. Use the Label and Text properties to add the labels to the header cells.
Example
This example code creates a spreadsheet shown in the figure above, with two columns in the row header and three rows in the column header.
| C# |
Copy Code
|
|---|---|
// Set the number or rows and columns in the headers. fpSpread1.Sheets[0].ColumnHeaderRowCount = 3; fpSpread1.Sheets[0].RowHeaderColumnCount = 2; // Span the header cells as needed. fpSpread1.Sheets[0].AddColumnHeaderSpanCell(1, 0, 1, 2); fpSpread1.Sheets[0].AddColumnHeaderSpanCell(1, 2, 1, 2); fpSpread1.Sheets[0].AddColumnHeaderSpanCell(1, 4, 1, 2); fpSpread1.Sheets[0].AddColumnHeaderSpanCell(1, 6, 1, 2); fpSpread1.Sheets[0].AddColumnHeaderSpanCell(0, 0, 1, 8); fpSpread1.Sheets[0].AddRowHeaderSpanCell(0, 0, 12, 1); // Set the labels as needed -- using the Label property or // the cell Text property. fpSpread1.Sheets[0].ColumnHeader.Columns[0].Label = "East"; fpSpread1.Sheets[0].ColumnHeader.Columns[1].Label = "West"; fpSpread1.Sheets[0].ColumnHeader.Columns[2].Label = "East"; fpSpread1.Sheets[0].ColumnHeader.Columns[3].Label = "West"; fpSpread1.Sheets[0].ColumnHeader.Columns[4].Label = "East"; fpSpread1.Sheets[0].ColumnHeader.Columns[5].Label = "West"; fpSpread1.Sheets[0].ColumnHeader.Columns[6].Label = "East"; fpSpread1.Sheets[0].ColumnHeader.Columns[7].Label = "West"; fpSpread1.Sheets[0].ColumnHeader.Cells[0,0].Text = "Fiscal Year 2004"; fpSpread1.Sheets[0].ColumnHeader.Cells[1,0].Text = "1st Quarter"; fpSpread1.Sheets[0].ColumnHeader.Cells[1,2].Text = "2nd Quarter"; fpSpread1.Sheets[0].ColumnHeader.Cells[1,4].Text = "3rd Quarter"; fpSpread1.Sheets[0].ColumnHeader.Cells[1,6].Text = "4th Quarter"; // Set the row header so that the label displays. fpSpread1.Sheets[0].RowHeader.Columns[0].Width = 45; fpSpread1.Sheets[0].RowHeader.Cells[0,0].Text = "Branch #"; |
|
| VB |
Copy Code
|
|---|---|
’ Set the number or rows and columns in the headers. FpSpread1.Sheets(0).ColumnHeaderRowCount = 3 FpSpread1.Sheets(0).RowHeaderColumnCount = 2 ’ Span the header cells as needed. FpSpread1.Sheets(0).AddColumnHeaderSpanCell(1, 0, 1, 2) FpSpread1.Sheets(0).AddColumnHeaderSpanCell(1, 2, 1, 2) FpSpread1.Sheets(0).AddColumnHeaderSpanCell(1, 4, 1, 2) FpSpread1.Sheets(0).AddColumnHeaderSpanCell(1, 6, 1, 2) FpSpread1.Sheets(0).AddColumnHeaderSpanCell(0, 0, 1, 8) FpSpread1.Sheets(0).AddRowHeaderSpanCell(0, 0, 12, 1) ’ Set the labels as needed -- using the Label property or ’ the cell Text property. FpSpread1.Sheets(0).ColumnHeader.Columns(0).Label = "East" FpSpread1.Sheets(0).ColumnHeader.Columns(1).Label = "West" FpSpread1.Sheets(0).ColumnHeader.Columns(2).Label = "East" FpSpread1.Sheets(0).ColumnHeader.Columns(3).Label = "West" FpSpread1.Sheets(0).ColumnHeader.Columns(4).Label = "East" FpSpread1.Sheets(0).ColumnHeader.Columns(5).Label = "West" FpSpread1.Sheets(0).ColumnHeader.Columns(6).Label = "East" FpSpread1.Sheets(0).ColumnHeader.Columns(7).Label = "West" FpSpread1.Sheets(0).ColumnHeader.Cells(0,0).Text = "Fiscal Year 2004" FpSpread1.Sheets(0).ColumnHeader.Cells(1,0).Text = "1st Quarter" FpSpread1.Sheets(0).ColumnHeader.Cells(1,2).Text = "2nd Quarter" FpSpread1.Sheets(0).ColumnHeader.Cells(1,4).Text = "3rd Quarter" FpSpread1.Sheets(0).ColumnHeader.Cells(1,6).Text = "4th Quarter" ’ Set the row header so that the label displays. FpSpread1.Sheets(0).RowHeader.Columns(0).Width = 45 FpSpread1.Sheets(0).RowHeader.Cells(0,0).Text = "Branch #" |
|
Using the Spread Designer
- Select the sheet tab for the sheet for which you want to display multiple header rows or columns.
- In the properties list, in the Appearance category, double-click the ColumnHeader or RowHeader property to display the properties for the column or row header.
- Set the RowCount property to the number or rows you want in the column header or the ColumnCount property to the number of columns you want in the row header.
- From the File menu choose Apply and Exit to apply your changes to the component and exit Spread Designer.