This is for users of Visual Studio .NET 2008.
Background
For users of Microsoft Visual Studio .NET 2008, to avoid exceptions when loading a form from a previously created project, please follow these instructions for setting a binding redirect for each of the assemblies of Spread Windows Forms.
If you have made changes to a Spread control on a form at design time that required writing objects to the RESX file for the form, then you will not be able to load the form at design time unless you set a binding redirect in the machine.config file for each of these assemblies used by Spread:
assembly name |
latest previous version |
new version |
|---|---|---|
| FarPoint.Win | 5.0.0.0 | 6.0.0.0 |
| FarPoint.Win.Spread | 5.0.1.0 - 5.0.2.0 | 5.0.3.0 |
| 6.0.0.0 | 6.0.1.0 | |
Note that your version numbers may vary depending on whether you had a beta or release candidate version. This table shows a general example. See the current release notes for version details.
Without these binding redirects, if the previous version of an assembly is present in the Global Assembly Cache (GAC), then loading the form will throw invalid cast exceptions. Follow the procedure below for each of these assemblies.
Binding Redirect Procedure
To add the binding redirect:
- Open the Control Panel (Start > Settings > Control Panel).
- Run the Administrative Tools.
- Run the Microsoft .NET Framework Configuration.
- From the .NET Framework Configuration window, select Configured Assemblies from the menu on the left.
- In the Configured Assemblies pane on the right, in the Task area, select Configure an Assembly.
- In the Configure an Assembly dialog, with the Choose an assembly from the assembly cache option button selected (the default), click the Choose Assembly button in the lower right.
- In the Choose Assembly from Assembly Cache window, scroll down until the assembly name appears. For example, find FarPoint.Win.Spread.
- Select the assembly, for example, FarPoint.Win.Spread version 1.0.1.0, from the list and click Finish.
- The Properties window for that assembly appears.
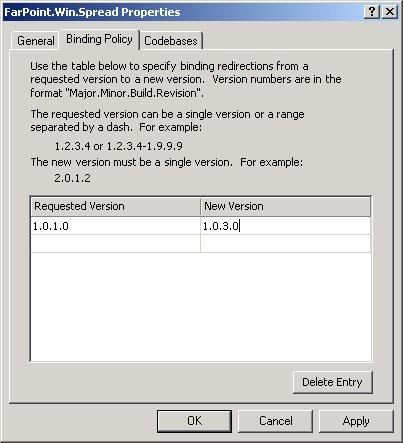
- Select the Binding Policy tab and type in the previous version number in the Request Version column and the new version number in the New
Version column. For example, for FarPoint.Win.Spread, type in 1.0.1.0 in the Request Version column and 1.0.3.0 in the New version, as shown here.
(Remember, your version numbers may differ from those given here.)

- Click OK.
Repeat this procedure for each of the assemblies listed in the table at the top of this page.
All references to the previous version of the assembly (FarPoint.Win.Spread.dll, version 1.0.1.0 in the above example) are then redirected to the new version of the assembly (FarPoint.Win.Spread.dll, version 1.0.3.0 in the above example), including references in the RESX file for a form at design time.
If you subsequently uninstall the new version of Spread Windows Forms from your machine, then you need to remove the binding redirects. Refer to the procedure below for instructions.
To be clear:
- You do not need to keep this binding redirect after you have upgraded all your projects and loaded and saved them in the new version.
Removing Binding Redirect Procedure
To remove the binding redirect (if you have uninstalled the new version of Spread Windows Forms from your machine or you are finished upgrading all your projects and you do not need the binding redirect anymore):
- Open Control Panel (Start > Settings > Control Panel).
- Run Administrative Tools.
- Run Microsoft .NET Framework Configuration.
- From the .NET Framework Configuration window, select Configured Assemblies from the menu on the left.
- In the Configured Assemblies pane on the right, in the Task area, select View List of Configured Assemblies.
- Select the assembly name.
- Press the Delete key and select "Yes" in the confirmation dialog to remove the assembly configuration.
Repeat this procedure for each of the assemblies used in Spread Windows Forms listed in the table at the top of this page.