This topic demonstrates how to use check mark and radio mark types using the CheckMarkImageUrl, RadioMarkImageUrl, AllowMultipleSelect, AllowSelectItem, and Selected properties.
This first set of instructions shows how to create a check mark. The second set of instructions shows how to create a radio mark.
Check Mark
1. Open the C1WebCommandEditor and select C1WebMenu in the tree view. Locate its behavior properties and set AllowSelectItem and AllowMultipleSelect to True.
2. Expand the SpecialSymbolStyle node and click on the ellipsis button next to the CheckMarkImageUrl property. The Select Image dialog box opens.
3. Select the custom check mark image from the Select Image dialog box. If a check image does not exist, please create one and add it to a folder in your application.
4. Run the application. The check mark symbol appears next to the selected item.
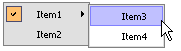
The check mark will be used as an image for all selected items if Item.Selected = True.
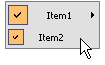
Radio Mark
1. Open the C1WebCommandEditor and select C1WebMenu in the tree view. Locate its behavior properties and set AllowSelectItem and AllowMultipleSelect to False.
2. Expand the SpecialSymbolStyle node and click on the ellipsis button next to the RadioMarkImageUrl property. The Select Image dialog box opens.
3. Select the custom radio mark image from the Select Image dialog box. If a radio mark image does not exist, please create one and add it to a folder in your application.
4. Run the application. The radio mark symbol appears next to the selected item.
The radio mark will be used as an image for all selected items if Item.Selected = True.
Send comments about this topic to ComponentOne. Copyright © ComponentOne LLC. All rights reserved. |