Step 2: Initialize the Controls
We could have set the initial properties of the fgDDManual and fgDDAuto controls using the Visual Basic Property window, but chose to do it using the Form_Load event instead. Here is the routine that initializes the controls:
Private Sub Form_Load()
' initialize manual control
With fgDDManual
.Cell(flexcpText, 0, 0) = "Manual"
.FixedCols = 0
.Editable = True
.OLEDragMode = flexOLEDragManual
.OLEDropMode = flexOLEDropManual
End With
' initialize auto control
With fgDDAuto
.Cell(flexcpText, 0, 0) = "Auto"
.FixedCols = 0
.Editable = True
.OLEDragMode = flexOLEDragAutomatic
.OLEDropMode = flexOLEDropAutomatic
End With
End Sub
The code makes both grids editable, so you can type into them, and sets the OLEDragMode and OLEDropMode properties to make each control an OLE drag-and-drop source and a target.
There is no need to initialize the Rich Editbox, since its OLEDragMode and OLEDropMode properties are set to automatic by default.
That's all it takes to implement automatic OLE drag and drop. If you run the project now, you will be able to drag text from the Rich Editbox into the fgDDAuto grid. You may also drag files from the Window Explorer, ranges from Microsoft Excel, or text from Microsoft Word.
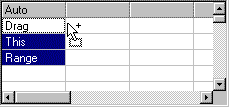
You can also drag selections from the fgDDAuto grid into any OLE drop target (including other areas of the same control). To do this, select a range and move the mouse cursor to an edge around the selection. The cursor will turn into a default OLE drag cursor, as the picture below shows. Click the left mouse button and start dragging. The cursor will give you visual feedback whenever you move it over an OLE drop target.

As you can see, implementing automatic OLE drag and drop is easy. Just set the OLEDragMode and OLEDropMode properties to automatic and you are done.
Sometimes you may want to customize the way in which OLE drag and drop works. This sample shows how you can do that by customizing both the drag (OLE source) behavior and the drop (OLE target) behavior of the fgDDManual control.