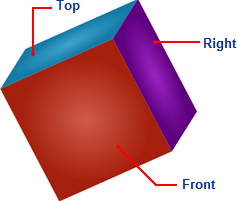
C1Cube, as is typical of cubes, has six faces. To make it easier to define where content is placed, each face is named. Faces are defined as Front, Back, Left, Right, Top, and Bottom. Each face has an opposite face, Front and Back, Left and Right, and Top and Bottom are opposite pairs. By default, the Front face is initially visible. In the image below the Front, Top, and Right faces are visible:
You can add content to each of Cube for WPF's faces by using the Face attached property. You would set the face that an item appears, by setting the Face attached property on that item. For example, in the following XAML markup you can see that the button within the C1Cube control is placed on the front face of the cube:
<c1ext:C1Cube Name="c1cube1" Height="200">
<Button Content="Click Me!" MinHeight="50" c1ext:C1Cube.Face="Front"/>
</c1ext:C1Cube>
You can use the ShowFace method to smoothly rotate the cube so a particular face is facing forward. See Showing a Cube Face for an example. You can also use the GetFace and SetFace methods to get or set the value of the Face attached property for the specified element. See Adding Items to a Cube for an example.