Binding Data to the Header and Content Panel Using Templates
In this topic, you will learn how to bind data to the C1Expander control's heading and content panel using the ContentTemplate template and HeaderTemplate template. This topic assumes that you are working in Microsoft Expression Blend.
Step 1: Add the C1Expander Control to the Project and Prepare it for Data Binding
Complete the following steps:
1. Add a C1Expander control to your WPF project.
2. Select the C1Expander control to expose its properties in the Properties tab and complete the following:
3. Set the Name property to "NameAgeHolder1".
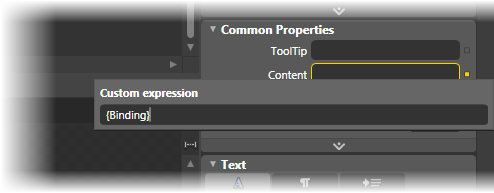
4. Next to the Content property, click the Advanced options button and select Custom Expression. Set the Custom expression field to "{Binding}". This sets up the Content property to pass the DataContext directly to its template, which you will create in a later step.
5. Next to the Header property, click the Advanced options button and select Custom Expression. Set the Custom expression field to "{Binding}". This sets up the Header to pass the DataContext directly to its template, which you will create in a later step.
Step 2: Create Templates, Add a Control to Each Template, and Bind Each Control to a Data Source Property
Complete the following steps:
1. Create the first template, the HeaderTemplate, by completing the following steps:
a. Click the NameAgeHolder1 breadcrumb and select Edit Additional Templates | Edit HeaderTemplate | Create Empty.
The Create DataTemplate Resource dialog box opens.
b. In the Name (Key) field, enter "NameTemplate".
c. Click OK to close the Create DataTemplate Resource dialog box to create the new template.
d. Click the Assets tab and then, in the search field, enter "Label" to find the Label control.
e. Double-click the Label icon to add the Label control to your template.
f. Select the Label control to expose its properties in the Properties tab.
g. Next to the Content property, click the Advanced options button and select Custom Expression. Set the Custom expression field to "{Binding Name}". This sets the Label control's Content property to the value of the Name property, which is a property you'll create in code later.
2. Create the second template, the ContentTemplate, by completing the following steps:
a. Click the NameAgeHolder1 breadcrumb and select Edit Additional Templates |Edit Generated Content (ContentTemplate) | Create Empty.
The Create DataTemplate Resource dialog box opens.
b. In the Name (Key) field, enter "AgeTemplate".
c. Click OK to close the Create DataTemplate Resource dialog box to create the new template.
d. Click the Assets tab and then, in the search field, enter "Label" to find the Label control.
e. Double click the Label icon to add the Label control to your template.
f. Select the Label control to expose its properties in the Properties tab.
g. Next to the Content property, click the Advanced options button and select Custom Expression. Set the Custom expression field to "{Binding Age}". This sets the Label control's Content property to the value of the Age property, which is a property you'll create in code later.
Step 3: Create the Data Source
Complete the following steps:
1. Open the MainPage.xaml code page (this will be either MainPage.xaml.cs or MainPage.xaml.vb depending on which language you've chosen for your project).
2. Add the following class to your project, placing it beneath the namespace declaration:
Public Class NameAndAge
Public Sub New(name As String, age As Integer)
Name = name
Age = age
End Sub
Public Property Name() As String
Get
End Get
Set
End Set
End Property
Public Property Age() As Integer
Get
End Get
Set
End Set
End Property
End Class
•C#
public class NameAndAge
{
public NameAndAge(string name, int age)
{
Name = name;
Age = age;
}
public string Name { get; set; }
public int Age { get; set; }
}
This class creates a class with two properties: a string property named Name and a numeric property named Age.
3. Add the following code beneath the InitializeComponent() method to set the Name property and the Age property:
NameAgeHolder1.DataContext = New NameAndAge("Gaius Baltar", 40)
•C#
NameAgeHolder1.DataContext = new NameAndAge("Gaius Baltar", 40);
Step 4: Run the Project and Observe the Results
Complete the following steps:
1. Press F5 to run the project and observe that the value of the Name property appears on the control's header bar.
![]()
2. Click the header bar to expand the control and observe that the value of the Age property appears in the content panel:
![]()