C1OrgChart allows you to create a collapsible C1OrgChart that behaves similarly to a TreeView control. Complete the following steps to expand and collapse C1OrgChart nodes:
1. From the Visual Studio File menu select New and choose Project.
2. In the New Project dialog box choose a language in the left-side menu, choose .NET Framework 4 in the Framework drop-down list, and enter OrgChart as a name for the project.
3. In the Solution Explorer, right-click the project name and choose Add Reference. In the Add Reference dialog box, locate and select the following assemblies and click OK to add references to your project:
•C1.Silverlight
•C1.Silverlight.OrgChart
4. Add the xmlns:c1="http://schemas.componentone.com/winfx/2006/xaml" namespace to your namespace declarations in the <Window> tag. This is a more general namespace that will work with most ComponentOne Silverlight controls.
5. Add the following namespace to your application's <Window> tag:
xmlns:local="clr-namespace:OrgChart"
6. Insert the following XAML markup directly above the <c1:C1OrgChart></c1:C1OrgChart> tags to create the C1OrgChart data templates:
<Window.Resources>
<!-- TemplateSelector: picks _tplDirector or _tlpOther -->
<local:PersonTemplateSelector x:Key="_personTplSelector">
<local:PersonTemplateSelector.DirectorTemplate>
<!-- data template for Directors -->
<DataTemplate>
<Border Background="Gold" BorderBrush="Black" BorderThickness="2 2 4 4" CornerRadius="6" Margin="20" MaxWidth="200">
<StackPanel Orientation="Vertical">
<Border CornerRadius="6 6 0 0" Background="Black">
<StackPanel Orientation="Horizontal">
<CheckBox Margin="4 0" IsChecked="{Binding IsCollapsed, Mode=TwoWay, RelativeSource={RelativeSource AncestorType=c1:C1OrgChart}}"/>
<Ellipse Width="12" Height="12" Fill="Gold" Margin="4" />
<TextBlock Text="{Binding Name}" FontWeight="Bold" FontSize="16" Foreground="Gold" />
</StackPanel>
</Border>
<TextBlock Text="{Binding Position}" Padding="6 0" FontSize="14" FontStyle="Italic" HorizontalAlignment="Right" />
</StackPanel>
</Border>
</DataTemplate>
</local:PersonTemplateSelector.DirectorTemplate>
<local:PersonTemplateSelector.OtherTemplate>
<!-- data template for everyone else -->
<DataTemplate>
<Border Background="WhiteSmoke" BorderBrush="Black" BorderThickness="1 1 2 2" CornerRadius="6" MaxWidth="200">
<StackPanel Orientation="Vertical">
<Border CornerRadius="6 6 0 0" Background="Black">
<StackPanel Orientation="Horizontal">
<CheckBox Margin="4 0" IsChecked="{Binding IsCollapsed, Mode=TwoWay, RelativeSource={RelativeSource AncestorType=c1:C1OrgChart}}"/>
<TextBlock Text="{Binding Name}" FontWeight="Bold" FontSize="14" Foreground="WhiteSmoke" Padding="4 0 0 0"></TextBlock>
</StackPanel>
</Border>
<TextBlock Text="{Binding Notes}" Padding="6 0" FontSize="9.5" TextWrapping="Wrap" />
<TextBlock Text="{Binding Position}" Padding="6 0" FontSize="12" FontStyle="Italic" HorizontalAlignment="Right" />
</StackPanel>
</Border>
</DataTemplate>
</local:PersonTemplateSelector.OtherTemplate>
</local:PersonTemplateSelector>
</Window.Resources>
7. Insert the following markup to create the C1OrgChart control and its control panel. The following XAML will add a ScrollViewer control in addition to the C1OrgChart control:
<!-- org chart -->
<ScrollViewer Background="White" Grid.Row="1" HorizontalScrollBarVisibility="Auto" VerticalScrollBarVisibility="Auto" Padding="0">
<c1:C1OrgChart x:Name="_orgChart" Grid.Row="1" Orientation="Horizontal" ItemTemplateSelector="{StaticResource _personTplSelector}"
ConnectorStroke="Black" ConnectorThickness="2" IsCollapsed="False">
<!-- scale transform bound to slider -->
<c1:C1OrgChart.RenderTransform>
<ScaleTransform ScaleX="{Binding Value, ElementName=_sliderZoom}" ScaleY="{Binding Value, ElementName=_sliderZoom}" />
</c1:C1OrgChart.RenderTransform>
<!-- template used to show tree nodes -->
<!-- not used in this sample since we are using a template selector -->
<!--<c1:C1OrgChart.ItemTemplate />-->
</c1:C1OrgChart>
</ScrollViewer>
8. Add the following XAML markup between the </Window.Resources> and the <c1:C1OrgChart> tags:
<!-- layout root -->
<Grid x:Name="LayoutRoot">
<Grid.RowDefinitions>
<RowDefinition Height="Auto" />
<RowDefinition />
</Grid.RowDefinitions>
<!-- control panel -->
<StackPanel Orientation="Horizontal" VerticalAlignment="Top" Margin="0 8">
<Button Content="New Data" Padding="8 0" Click="Button_Click" />
<TextBlock Text=" Zoom: " VerticalAlignment="Center" />
<Slider x:Name="_sliderZoom" VerticalAlignment="Center" Minimum=".01" Maximum="1" Value="1" Width="200" />
</StackPanel>
9. Right-click the page and select View Code from the list. Import the following namespace into the code file:
Imports C1.Silverlight.OrgChart
•C#
using C1.Silverlight.OrgChart;
10. Insert the following code directly below the InitializeComponent() method:
CreateData()
End Sub
Private Sub Button_Click(ByVal sender As Object, ByVal e As RoutedEventArgs)
CreateData()
End Sub
Private Sub CreateData()
Dim p = Data.Person.CreatePerson(10)
_orgChart.Header = p
End Sub
Public Property DEMO_Orientation As Orientation
Get
Return _orgChart.Orientation
End Get
Set(value As Orientation)
_orgChart.Orientation = value
End Set
End Property
Public Property DEMO_HorizontalContentAlignment As HorizontalAlignment
Get
Return _orgChart.HorizontalContentAlignment
End Get
Set(value As HorizontalAlignment)
_orgChart.HorizontalContentAlignment = value
End Set
End Property
Public Property DEMO_VerticalContentAlignment As VerticalAlignment
Get
Return _orgChart.VerticalContentAlignment
End Get
Set(value As VerticalAlignment)
_orgChart.VerticalContentAlignment = value
End Set
End Property
End Class
•C#
CreateData();
}
void Button_Click(object sender, RoutedEventArgs e)
{
CreateData();
}
void CreateData()
{
var p = Data.Person.CreatePerson(10);
_orgChart.Header = p;
}
public Orientation DEMO_Orientation
{
get
{
return _orgChart.Orientation;
}
set
{
_orgChart.Orientation = value;
}
}
public HorizontalAlignment DEMO_HorizontalContentAlignment
{
get
{
return _orgChart.HorizontalContentAlignment;
}
set
{
_orgChart.HorizontalContentAlignment = value;
}
}
public VerticalAlignment DEMO_VerticalContentAlignment
{
get
{
return _orgChart.VerticalContentAlignment;
}
set
{
_orgChart.VerticalContentAlignment = value;
}
}
}
11. Add the following code to select the templates for items being created:
'''Class used to select the templates for items being created.
Public Class PersonTemplateSelector
Inherits DataTemplateSelector
Public Overrides Function SelectTemplate(item As Object, container As DependencyObject) As DataTemplate
Dim p = TryCast(item, Data.Person)
'var e = Application.Current.RootVisual as FrameworkElement;
'return p.Position.IndexOf("Director") > -1
' ? e.Resources["_tplDirector"] as DataTemplate
' : e.Resources["_tplOther"] as DataTemplate;
Return If(p.Position.IndexOf("Director") > -1, DirectorTemplate, OtherTemplate)
End Function
' collapse the chart to a given level
Private Sub CollapseExpand(node As C1.WPF.OrgChart.C1OrgChart, level As Integer, maxLevel As Integer)
If level >= maxLevel Then
node.IsCollapsed = True
Else
node.IsCollapsed = False
For Each subNode In node.ChildNodes
CollapseExpand(subNode, level + 1, maxLevel)
Next
End If
End Sub
Public Property DirectorTemplate() As DataTemplate
Get
Return m_DirectorTemplate
End Get
Set(value As DataTemplate)
m_DirectorTemplate = Value
End Set
End Property
Private m_DirectorTemplate As DataTemplate
Public Property OtherTemplate() As DataTemplate
Get
Return m_OtherTemplate
End Get
Set(value As DataTemplate)
m_OtherTemplate = Value
End Set
End Property
Private m_OtherTemplate As DataTemplate
End Class
•C#
/// Class used to select the templates for items being created.
/// </summary>
public class PersonTemplateSelector : DataTemplateSelector
{
public override DataTemplate SelectTemplate(object item, DependencyObject container)
{
var p = item as Data.Person;
//var e = Application.Current.RootVisual as FrameworkElement;
//return p.Position.IndexOf("Director") > -1
// ? e.Resources["_tplDirector"] as DataTemplate
// : e.Resources["_tplOther"] as DataTemplate;
return p.Position.IndexOf("Director") > -1
? DirectorTemplate
: OtherTemplate;
}
// collapse the chart to a given level
void CollapseExpand(C1OrgChart node, int level, int maxLevel)
{
if (level >= maxLevel)
{
node.IsCollapsed = true;
}
else
{
node.IsCollapsed = false;
foreach (var subNode in node.ChildNodes)
{
CollapseExpand(subNode, level + 1, maxLevel);
}
}
}
public DataTemplate DirectorTemplate { get; set; }
public DataTemplate OtherTemplate { get; set; }
}
}
12. Locate your application name in the Solution Explorer. Right-click on the name and select Add | New Item from the list. Select Code File from the template window and name the code file Person.cs or Person.vb.
13. Add the following namespaces to the Person code file:
Imports System
Imports System.Collections
Imports System.Collections.Generic
Imports System.Collections.ObjectModel
•C#
using System;
using System.Collections;
using System.Collections.Generic;
using System.Collections.ObjectModel;
14. Insert the following code below the namespaces to create the hierarchical data items which will be called to create the data in the C1OrgChart:
'''Class used to select the templates for items being created.
Public Class PersonTemplateSelector
Inherits DataTemplateSelector
Public Overrides Function SelectTemplate(item As Object, container As DependencyObject) As DataTemplate
Dim p = TryCast(item, Data.Person)
'var e = Application.Current.RootVisual as FrameworkElement;
'return p.Position.IndexOf("Director") > -1
' ? e.Resources["_tplDirector"] as DataTemplate
' : e.Resources["_tplOther"] as DataTemplate;
Return If(p.Position.IndexOf("Director") > -1, DirectorTemplate, OtherTemplate)
End Function
' collapse the chart to a given level
Private Sub CollapseExpand(node As C1.WPF.OrgChart.C1OrgChart, level As Integer, maxLevel As Integer)
If level >= maxLevel Then
node.IsCollapsed = True
Else
node.IsCollapsed = False
For Each subNode In node.ChildNodes
CollapseExpand(subNode, level + 1, maxLevel)
Next
End If
End Sub
Public Property DirectorTemplate() As DataTemplate
Get
Return m_DirectorTemplate
End Get
Set(value As DataTemplate)
m_DirectorTemplate = Value
End Set
End Property
Private m_DirectorTemplate As DataTemplate
Public Property OtherTemplate() As DataTemplate
Get
Return m_OtherTemplate
End Get
Set(value As DataTemplate)
m_OtherTemplate = Value
End Set
End Property
Private m_OtherTemplate As DataTemplate
End Class
•C#
namespace Data
{
/// <summary>
/// Our hierarchical data item: A Person has Subordinates of type Person.
/// </summary>
public class Person
{
ObservableCollection<Person> _list = new ObservableCollection<Person>();
#region ** object model
public string Name { get; set; }
public string Position { get; set; }
public string Notes { get; set; }
public IList<Person> Subordinates
{
get { return _list; }
}
public int TotalCount
{
get
{
var count = 1;
foreach (var p in Subordinates)
{
count += p.TotalCount;
}
return count;
}
}
public override string ToString()
{
return string.Format("{0}:\r\n\t{1}", Name, Position);
}
#endregion
#region ** Person factory
static Random _rnd = new Random();
static string[] _positions = "Director|Manager|Designer|Developer|Writer|Assistant".Split('|');
static string[] _areas = "Development|Marketing|Sales|Support|Accounting".Split('|');
static string[] _first = "John|Paul|Dan|Dave|Rich|Mark|Greg|Erin|Susan|Sarah|Tim|Trevor|Kevin|Mark|Dewey|Huey|Larry|Moe|Curly|Adam|Albert".Split('|');
static string[] _last = "Smith|Doe|Williams|Sorensen|Hansen|Mandela|Johnson|Ward|Woodman|Jordan|Mays|Kevorkian|Trudeau|Hendrix|Clinton".Split('|');
static string[] _verb = "likes|reads|studies|hates|exercises|dreams|plays|writes|argues|sleeps|ignores".Split('|');
static string[] _adjective = "long|short|important|pompous|hard|complex|advanced|modern|boring|strange|curious|obsolete|bizarre".Split('|');
static string[] _noun = "products|tasks|goals|campaigns|books|computers|people|meetings|food|jokes|accomplishments|screens|pages".Split('|');
public static Person CreatePerson(int level)
{
var p = CreatePerson();
if (level > 0)
{
level--;
for (int i = 0; i < _rnd.Next(1, 4); i++)
{
p.Subordinates.Add(CreatePerson(_rnd.Next(level / 2, level)));
}
}
return p;
}
public static Person CreatePerson()
{
var p = new Person();
p.Position = string.Format("{0} of {1}", GetItem(_positions), GetItem(_areas));
p.Name = string.Format("{0} {1}", GetItem(_first), GetItem(_last));
p.Notes = string.Format("{0} {1} {2} {3}", p.Name, GetItem(_verb), GetItem(_adjective), GetItem(_noun));
while (_rnd.NextDouble() < .5)
{
p.Notes += string.Format(" and {0} {1} {2}", GetItem(_verb), GetItem(_adjective), GetItem(_noun));
}
p.Notes += ".";
return p;
}
static string GetItem(string[] list)
{
return list[_rnd.Next(0, list.Length)];
}
#endregion
}
}
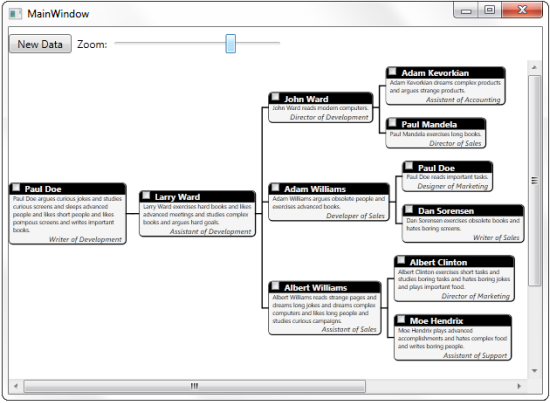
15. Press F5 to run your application. The C1OrgChart should resemble the following image:

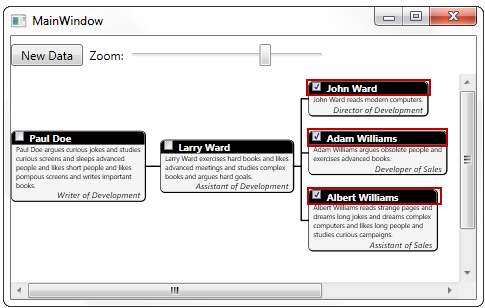
Click the CheckBox in the corner of one of the Main Item nodes. Note how the C1OrgChart collapses:
