The first aspect of the control that you may want to customize is the layout. The control presents two columns, one with labels and one with editors. The columns have the same size by default, but you can change that by changing the value of the LabelWidth and EditorWidth properties.
For example, you could make the label column narrower in the example above by adding one line of code:
Public Sub New()
InitializeComponent()
' Create object to browse
Dim customer = New Customer()
' Create C1PropertyGrid
Dim pg = New C1PropertyGrid()
LayoutRoot.Children.Add(pg)
' Customize the PropertyGrid layout
pg.LabelWidth = 100
' Show customer properties
pg.SelectedObject = customer
End Sub
•C#
public Page()
{
InitializeComponent();
// Create object to browse
var customer = new Customer();
// Create C1PropertyGrid
var pg = new C1PropertyGrid();
LayoutRoot.Children.Add(pg);
// Customize the PropertyGrid layout
pg.LabelWidth = 100;
// Show customer properties
pg.SelectedObject = customer;
}
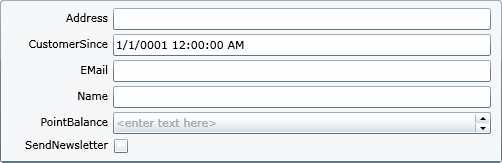
The result would be as shown below:
As you can see, the label column is now narrower and more room is left for the editor part. If you resize the form, you will notice that the width of the label column remains constant.