By default, the drop-down list will attempt to open at the bottom of the control; if there is no room at the bottom to display the whole drop-down list, it will appear above the control. You can, however, specify where you would like the drop-down list to open.
In the Designer
Complete the following steps:
1. Click the C1ComboBox control once to select it.
2. In the Properties window, click the DropDownDirection drop-down arrow and select an option. For this example, select ForceAbove.
3. Run the program and click the drop-down arrow. Observe that the drop-down list appears above the control.
In XAML
Complete the following steps:
1. Add
DropDownDirection="ForceAbove" to the
<c1:C1ComboBox> tags so that the markup resembles the
following:
<c1:C1ComboBox Width="249" DropDownDirection="ForceAbove">
2. Run the program and click the drop-down arrow. Observe that the drop-down list appears above the control.
In Code
Complete the following steps:
1. Open the MainPage.xaml.cs page.
2. Add following code beneath the InitializeComponent() method:
C1ComboBox1.DropDownDirection = ForceAbove
•C#
c1ComboBox1.DropDownDirection = ForceAbove;
3. Run the program and click the drop-down arrow. Observe that the drop-down list appears above the control.
![]() This Topic Illustrates the Following:
This Topic Illustrates the Following:
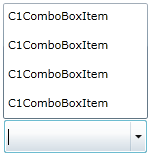
In the following image, a combo box's drop-down list is forced to open above the control.