 What You've
Accomplished
What You've
AccomplishedIn the last step you set up the grid application, but the grid currently contains no data – if you run the application now you'll see a blank grid. In this step you'll continue in Visual Studio by adding an XML data source to your project and binding the grid to the data source.
To add a data source and bind the grid in Visual Studio, complete the following steps:
1. In the Solution Explorer window, right-click the project and select Add | New Item.
2. In the Add New Item dialog box, select XML File from the list of installed templates, name the file "Products.xml", and click Add to close the dialog box.
The Products.xml file should now be included in your project, and should have opened automatically.
3. Replace the existing text in the Products.xml file with the following XML markup and save the file:
<?xml version="1.0" encoding="utf-8" ?>
<Products>
<Product Name="Chai" Category="Beverages" Unit="10 boxes x 20 bags" Price="18" />
<Product Name="Chang" Category="Beverages" Unit="24 - 12 oz bottles" Price="19" />
<Product Name="Aniseed Syrup" Category="Condiments" Unit="12 - 550 ml bottles" Price="10" />
<Product Name="Chef Anton's Cajun Seasoning" Category="Condiments" Unit="48 - 6 oz jars" Price="22" />
<Product Name="Chef Anton's Gumbo Mix" Category="Condiments" Unit="36 boxes" Price="21.35" />
<Product Name="Grandma's Boysenberry Spread" Category="Condiments" Unit="12 - 8 oz jars" Price="25" />
<Product Name="Uncle Bob's Organic Dried Pears" Category="Produce" Unit="12 - 1 lb pkgs." Price="30" />
<Product Name="Northwoods Cranberry Sauce" Category="Condiments" Unit="12 - 12 oz jars" Price="40" />
<Product Name="Mishi Kobe Niku" Category="Meat/Poultry" Unit="18 - 500 g pkgs." Price="97" />
<Product Name="Ikura" Category="Seafood" Unit="12 - 200 ml jars" Price="31" />
<Product Name="Queso Cabrales" Category="Dairy Products" Unit="1 kg pkg." Price="21" />
<Product Name="Queso Manchego La Pastora" Category="Dairy Products" Unit="10 - 500 g pkgs." Price="38" />
<Product Name="Konbu" Category="Seafood" Unit="2 kg box" Price="6" />
<Product Name="Tofu" Category="Produce" Unit="40 - 100 g pkgs." Price="23.25" />
<Product Name="Genen Shouyu" Category="Condiments" Unit="24 - 250 ml bottles" Price="15.5" />
<Product Name="Pavlova" Category="Condiments" Unit="32 - 500 g boxes" Price="17.45" />
<Product Name="Alice Mutton" Category="Meat/Poultry" Unit="20 - 1 kg tins" Price="39" />
<Product Name="Carnarvon Tigers" Category="Seafood" Unit="16 kg pkg." Price="62.5" />
<Product Name="Teatime Chocolate Biscuits" Category="Confections" Unit="10 boxes x 12 pieces" Price="9.2" />
<Product Name="Sir Rodney's Marmalade" Category="Confections" Unit="30 gift boxes" Price="81" />
<Product Name="Sir Rodney's Scones" Category="Confections" Unit="24 pkgs. x 4 pieces" Price="10" />
<Product Name="Gustaf's Knäckebröd" Category="Grains/Cereals" Unit="24 - 500 g pkgs." Price="21" />
<Product Name="Tunnbröd" Category="Grains/Cereals" Unit="12 - 250 g pkgs." Price="9" />
<Product Name="Guaraná Fantástica" Category="Beverages" Unit="12 - 355 ml cans" Price="4.5" />
<Product Name="NuNuCa Nuß-Nougat-Creme" Category="Confections" Unit="20 - 450 g glasses" Price="14" />
</Products>
This will add data taken from the Products table of the standard Microsoft Northwind database.
4. Right-click the project and select Add Reference. In the Add Reference dialog box, locate System.Xml.Linq and click OK to add the reference.
5. Choose MainPage.xaml, right-click the page, and select View Code in the context menu to open the Code Editor.
6. At the top of the Code Editor, add the following code to import namespaces:
Imports System.Xml.Linq
Imports C1.Silverlight.DataGrid
•C#
using System.Xml.Linq;
using C1.Silverlight.DataGrid;
7. Replace the existing code with the following code to initialize the data source, and bind the C1DataGrid.ItemsSource property to the XML data source:
Partial Public Class MainPage
Inherits UserControl
Public Sub New()
InitializeComponent()
LoadData()
End Sub
' Create the Product class.
Public Class Product
Private _Name As String
Public Property Name() As String
Get
Return _Name
End Get
Set(ByVal value As String)
_Name = value
End Set
End Property
Private _Category As String
Public Property Category() As String
Get
Return _Category
End Get
Set(ByVal value As String)
_Category = value
End Set
End Property
Private _Unit As String
Public Property Unit() As String
Get
Return _Unit
End Get
Set(ByVal value As String)
_Unit = value
End Set
End Property
Private _Price As String
Public Property Price() As String
Get
Return _Price
End Get
Set(ByVal value As String)
_Price = value
End Set
End Property
End Class
Private Sub LoadData()
' Initialize the XML data source.
Dim ProductsDoc As XDocument = XDocument.Load("Products.xml")
Dim data As IEnumerable(Of Product) = (From Product In ProductsDoc.Descendants("Product") Select New Product With {.Name = Product.Attribute("Name").Value, .Category = Product.Attribute("Category").Value, .Unit = Product.Attribute("Unit").Value, .Price = Product.Attribute("Price").Value}).ToList
' Bind the C1DataGrid control to the data source.
c1dg.ItemsSource = data
End Sub
End Class
•C#
public MainPage()
{
InitializeComponent();
LoadData();
}
// Create the Product class.
public class Product
{
public string Name { get; set; }
public string Category { get; set; }
public string Unit { get; set; }
public string Price { get; set; }
}
private void LoadData()
{
// Initialize the XML data source.
XDocument ProductsDoc = XDocument.Load("Products.xml");
List<Product> data = ( from Product in ProductsDoc.Descendants( "Product" )
select new Product
{
Name = Product.Attribute("Name").Value,
Category = Product.Attribute("Category").Value,
Unit = Product.Attribute("Unit").Value,
Price = Product.Attribute("Price").Value
}
).ToList();
// Bind the C1DataGrid control to the data source.
c1dg.ItemsSource = data;
}
What You've
Accomplished
If you save and run your application you'll observe that the grid is now populated with data from the Products.xml file:
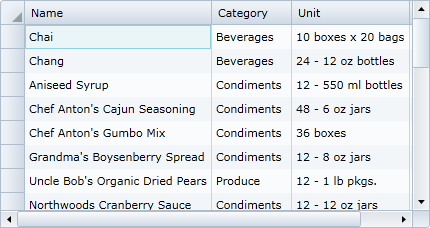
You've successfully bound DataGrid for Silverlight's C1DataGrid control to an XML data source. In the next step you'll customize the appearance and behavior of the C1DataGrid control.