In this step you'll create and then format the DataList control.
To create the DataList control, complete the following steps:
1. From the Toolbox, drag a DataList control to the page. The control displays a message saying that an ItemTemplate is required. The DataList control uses templates to define the appearance of the list header, footer, items, and item separators.
2. To create the
ItemTemplate, click the smart tag (![]() ) above the DataList
control and select Edit Templates from the Data List Tasks
menu.
) above the DataList
control and select Edit Templates from the Data List Tasks
menu.
Visual Studio will show a placeholder where you can drag controls that make up the template.
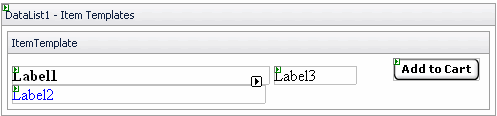
3. Click the ItemTemplate division and add three Label controls and one C1AddToCart control to the template. The labels will display the item name, description, and price.
4. Set the following properties to format the controls:
Set Label1's Font.Bold property to True.
Set Label2's ForeColor property to Blue.
Set C1AddToCart1's ButtonType property to WinXP.
5. Resize and type spaces between the controls.
The ItemTemplate should look similar to the following:
To format the DataList's appearance, complete the following steps:
1. Right-click the DataList control and select the End Template Editing menu item.
2. In the DataList Tasks menu, select Auto Format. The Auto Format dialog box appears.
3. Choose the Sand & Sky scheme and click OK.
4. To add a header to the DataList control:
Click
the smart tag (![]() )
above the DataList control and select Edit Templates from the
Data List Tasks menu. Then select Header Template from the
Display drop-down box.
)
above the DataList control and select Edit Templates from the
Data List Tasks menu. Then select Header Template from the
Display drop-down box.
Type "Welcome to the SouthWind Web Store" into the template.
|