Step 3: Creating the View Using C1Chart
1. Create a new Silverlight UserControl named SaleView.xaml and add the following XAML above the LayoutRoot grid:
<UserControl.Resources>
<local:SaleViewModel x:Key="viewModel" />
</UserControl.Resources>
<UserControl.DataContext>
<Binding Source="{StaticResource viewModel}"/>
</UserControl.DataContext>
This XAML declares a SaleViewModel as a Resource and sets it to the DataContext of the UserControl. At runtime, the View will now be bound to the ViewModel. Controls within the View can now bind to public properties of the ViewModel.
2. Add a C1Chart control to the page.
3. Replace the XAML for C1Chart with the following code:
<c1:C1Chart ChartType="Column" Name="c1Chart1" Palette="Module">
<c1:C1Chart.Data>
<c1:ChartData ItemsSource="{Binding Sales}" ItemNameBinding="{Binding Product}">
<c1:DataSeries Label="Value" ValueBinding="{Binding Value}" />
<c1:DataSeries Label="Discount" ValueBinding="{Binding Discount}" />
</c1:ChartData>
</c1:C1Chart.Data>
<c1:C1ChartLegend />
</c1:C1Chart>
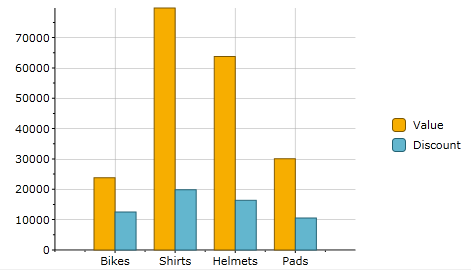
This XAML defines a C1Chart with two data series. The ChartData’s ItemsSource is set to the collection of Sales objects exposed by our ViewModel. Each DataSeries has its ValueBinding property set and we also set the ItemNameBinding to display our product names along the X-axis.
Note: If you are using XYDataSeries, then you should specify the XValueBinding for each series and you should not set the ItemNameBinding.
4. Open the App.xaml.cs application configuration file and in the Application_Startup event, replace the following code:
private void Application_Startup(object sender, StartupEventArgs e)
{
this.RootVisual = new Views.SaleView();
}
This code sets the RootVisual to show your SaleView upon startup.
5. Run your application and observe that the C1Chart appears to be bound to the Sales data from the ViewModel.
