To create a new XLSX file using Excel for Silverlight, three steps are required:
1. Add a reference to C1.Silverlight.Excel.dlland create a C1XLBook.
2. Add content to the sheets. Each sheet contains cells (XLCell objects) that have a Value and a Style property.
3. Save the book to a file using the Save method.
For example, the following code creates a new Excel file with a single sheet containing numbers from 1 to 100.
•C#
private void button1_Click_1(object sender, RoutedEventArgs e)
{
// step 1: create a new workbook to be saved
SaveBook(book =>
{
// step 2: write content into some cells
XLSheet sheet = book.Sheets[0];
for (int i = 0; i < 100; i++)
sheet[i, 0].Value = i + 1;
});
}
// step 3: save the file
private void SaveBook(Action<C1XLBook> action)
{
var dlg = new SaveFileDialog();
dlg.Filter = "Excel Files (*.xlsx)|*.xlsx";
if (dlg.ShowDialog() == true)
{
try
{
var book = new C1XLBook();
if (action != null)
{
action(book);
}
using (var stream = dlg.OpenFile())
{
book.Save(stream);
}
}
catch (Exception x)
{
MessageBox.Show(x.Message);
}
}
}
Step 2 is the most interesting one. The code starts by retrieving an XLSheet object that represents the single worksheet in the new Excel workbook. This sheet is created automatically when you add or create a new C1XLBook. Then the code uses the sheet indexer to reference cells in the sheet and assign them values from 1 to 100.
Note that the indexer in the XLSheet object automatically creates cells, if necessary. This makes it easy to fill worksheets that you create. If you want to find out the sheet dimensions, use the sheet's Rows.Count and Columns.Count properties.
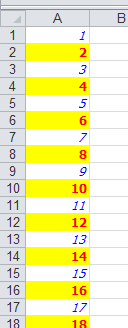
Of course, you are not limited to assigning values to cells. You can also use styles to format the cells. Just create one or more XLStyle objects and assign them to cells much like you did values. This revised version of the code above creates a sheet where even numbers are shown in bold red characters with yellow highlighting and odd numbers are shown in italic blue.
•C#
private void button1_Click_1(object sender, RoutedEventArgs e)
{
// step 1: create a new workbook to be saved
SaveBook(book =>
{
var sheet = book.Sheets[0];
// step 2: create styles for odd and even values
var styleOdd = new XLStyle(book);
styleOdd.Font = new XLFont("Tahoma", 9, false, true);
styleOdd.ForeColor = Colors.Blue;
var styleEven = new XLStyle(book);
styleEven.Font = new XLFont("Tahoma", 9, true, false);
styleEven.ForeColor = Colors.Red;
styleEven.BackColor = Colors.Yellow;
// step 3: write content into some cells
for (int i = 0; i < 100; i++)
{
XLCell cell = sheet[i, 0];
cell.Value = i + 1;
cell.Style = ((i + 1) % 2 == 0) ? styleEven : styleOdd;
}
});
}
// step 4: save the file
private void SaveBook(Action<C1XLBook> action)
{
var dlg = new SaveFileDialog();
dlg.Filter = "Excel Files (*.xlsx)|*.xlsx";
if (dlg.ShowDialog() == true)
{
try
{
var book = new C1XLBook();
if (action != null)
{
action(book);
}
using (var stream = dlg.OpenFile())
{
book.Save(stream);
}
}
catch (Exception x)
{
MessageBox.Show(x.Message);
}
}
}
The code is similar. The main difference is the new step 2, which creates styles for odd and even cells. The new styles are assigned to cells in step 3, along with the cell values.
This is what the file created by the code above looks like when opened in Microsoft Excel: