 What You've Accomplished
At run time when users click the Browse button and open the OpenFileDialog dialog box, they can typically select any type of file to open. You can apply a filter in the OpenFileDialog dialog box so that only files with a certain file extension will appear. So, for example, you can specify a filter so that only image files appear or only text files appear. You can set the Filter property to specify a filter as in the following steps.
At Design Time
To set the Filter property to filter image files at design time, complete the following steps:
1. Click the C1FilePicker control once to select it.
2. Navigate to the Properties window and locate the Filter item.
3. In the text box next to the Filter item and enter "Image Files(*.PNG;*.JPG;*.GIF)|*.PNG;*.JPG;*.GIF|All files (*.*)|*.*".
In XAML
For example, to set the Filter property to filter image files add Filter="Image Files(*.PNG;*.JPG;*.GIF)|*.PNG;*.JPG;*.GIF|All files (*.*)|*.*" to the <c1:C1FilePicker> tag so that it appears similar to the following:
<c1:C1FilePicker HorizontalAlignment="Left" Margin="112,36,0,0" Name="C1FilePicker1" VerticalAlignment="Top" Width="161" Filter="Image Files(*.PNG;*.JPG;*.GIF)|*.PNG;*.JPG;*.GIF|All files (*.*)|*.*" />
In Code
For example, to set the Filter property to filter image files, add the following code to your project:
Me.C1FilePicker1.Filter = "Image Files(*.BMP;*.JPG;*.GIF)|*.PNG;*.JPG;*.GIF|All files (*.*)|*.*"
•C#
this.c1FilePicker1.Filter = "Image Files(*.BMP;*.JPG;*.GIF)|*.PNG;*.JPG;*.GIF|All files (*.*)|*.*";
 What You've Accomplished
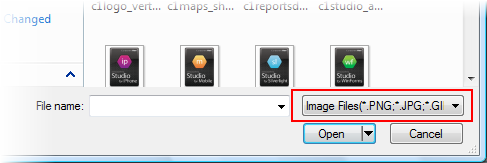
A filter will be applied to the OpenFileDialog dialog box. Run the application and click the Browse button in the C1FilePicker control. Notice that a filter has been applied so that only files with the PNG, JPG, and GIF extensions appear in the dialog box:

If you click the filter box's drop-down arrow you can choose to display all files. That is because the "All files" option was included in the filter logic applied in the steps above.