Start a new project and add a C1FlexGrid control to the form by clicking the C1FlexGrid icon on the Toolbox, then clicking on the form and dragging until the object has the proper size.
If you can't find the C1FlexGrid control in the toolbox, right-click on the toolbox and select Choose Items. Then, look for the C1FlexGrid control on the list of .NET components and make sure it is checked. If you can't find the grid in the component list, you may need to re-install the product.
- Set the following properties in the Properties window for the C1FlexGrid control:
Property Setting Dock Fill Cols.Count 5 Cols.Fixed 0 - Double-click the form caption area to open the code window. At the top of the file, add the following statement:
To write code in Visual Basic
Visual Basic Copy CodeImports C1.Win.C1FlexGrid
To write code in C#
C# Copy Codeusing C1.Win.C1FlexGrid;
This makes the objects defined in the C1FlexGrid assembly visible to the project and saves a lot of typing.
- Set up the columns by either in the designer through the Column Tasks menu or the C1FlexGrid Column Editor, or in code.
In the Designer
- Select the first column in the grid. This will open the Column Tasks menu for the column.
- Enter Product in the Column Caption and Data Field boxes.
- Set the Column Caption and Data Field boxes for the remainder of the columns as follows:
Column 1 Column Caption Region Data Field Region Column 2 Column Caption Salesperson Data Field Salesperson Column 3 Column Caption Sales Data Field Sales Column 4 Column Caption Bonus Data Field Bonus
Alternatively, the columns can also be set up through the C1FlexGrid Column Editor:
- Open the C1FlexGrid Column Editor by clicking Designer in the C1FlexGrid Tasks menu. For details on how to access the C1FlexGrid Column Editor, see Accessing the C1FlexGrid Column Editor.
- Select the Column 0 in the right pane.
- In the left pane, set the Name and Caption properties to Product.
- Set the Name and Caption properties for the remainder of the columns as follows:
Column 1 Name Region Caption Region Column 2 Name Salesperson Caption Salesperson Column 3 Name Sales Caption Sales Column 4 Name Bonus Caption Bonus - Click OK when finished to close the editor.
In Code
Add the following code to the Form_Load event:
To write code in Visual Basic
Visual Basic Copy Code' Set up the columns. Dim cols As String = "Product|Region|Salesperson|Sales|Bonus" Dim colNames As String() = cols.Split("|") Dim i%For i = 0 To C1FlexGrid1.Cols.Count - 1 C1FlexGrid1(0, i) = colNames(i) C1FlexGrid1.Cols(i).Name = colNames(i)NextTo write code in C#
C# Copy Code// Set up the columns. string cols = "Product|Region|Salesperson|Sales|Bonus"; string[] colNames = cols.Split(new char[] { '|' }); for (int i = 0; i <= this.c1FlexGrid1.Cols.Count - 1; i++) { c1FlexGrid1[0, i] = colNames[i]; c1FlexGrid1.Cols[i].Name = colNames[i]; }
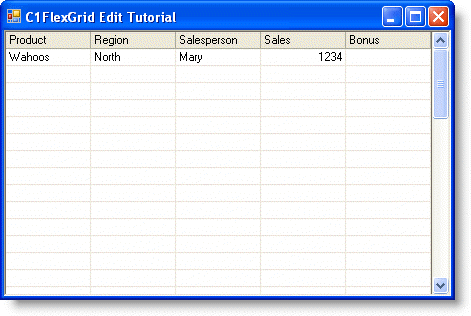
Run the program and observe the following:
That's it. Press F5 to run the project, and you can start typing data into the control. Press F2 or the spacebar to edit existing entries, or just type new entries over existing ones.

 Show All
 Hide All