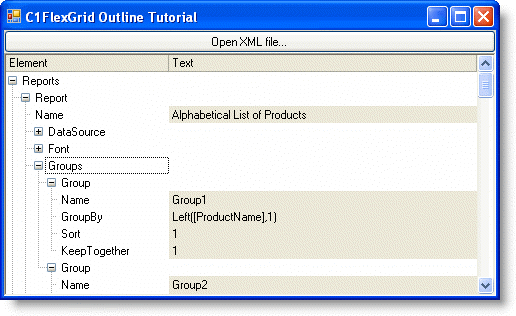
To read the data and build the outline, add code to the Button1_Click event and add the GetXMLData routine.
- Double-click the command button and add the following code to the Button1_Click event:
To write code in Visual Basic
Visual Basic Copy CodePrivate Sub Button1_Click(ByVal sender As System.Object, ByVal e As System.EventArgs) Handles Button1.Click ' Get the file name. Dim fo As OpenFileDialog = New OpenFileDialog() fo.DefaultExt = "xml" fo.Filter = "XML Files (*.xml)|*.xml" If fo.ShowDialog() <> Windows.Forms.DialogResult.OK Then Exit Sub ' Load the XML file. Dim xdoc As System.Xml.XmlDocument = New System.Xml.XmlDocument() xdoc.Load(fo.FileName) ' Stop redrawing to improve speed. C1FlexGrid1.Redraw = False ' Populate the grid. C1FlexGrid1.Rows.Count = 1 GetXMLData(xdoc.ChildNodes(1), 0) ' Autosize the tree column. C1FlexGrid1.AutoSizeCol(0) ' Show levels 0, 1, and 2. C1FlexGrid1.Tree.Show(2) ' Start redrawing. C1FlexGrid1.Redraw = True End SubTo write code in C#
C# Copy Codeprivate void button1_Click(System.object sender, System.EventArgs e) { // Get the file name. OpenFileDialog fo = new OpenFileDialog(); fo.DefaultExt = "xml"; fo.Filter = "XML Files (*.xml)|*.xml"; if ( fo.ShowDialog() != DialogResult.OK ) return; // Load the XML file. System.Xml.XmlDocument xdoc = new System.Xml.XmlDocument(); xdoc.Load(fo.FileName); // Stop redrawing to improve speed. c1FlexGrid1.Redraw = false; // Populate the grid. c1FlexGrid1.Rows.Count = 1; GetXMLData(xdoc.ChildNodes[1], 0); // Autosize the tree column. c1FlexGrid1.AutoSizeCol(0); // Show levels 0, 1, and 2. c1FlexGrid1.Tree.Show(2); // Start redrawing. c1FlexGrid1.Redraw = true; }Observe the following:
The routine starts by showing an OpenFileDialog that allows the user to select an XML file to load into the grid. When the file is selected, the routine loads it into an XmlDocument object, which parses the contents of the file into memory.
The routine then sets the grid's Redraw property to False to suspend repainting while the control is populated. This technique improves performance significantly, and you should always use it when adding substantial amounts of data to the C1FlexGrid.
Next, the routine clears any data by setting Count to 1, and calls the GetXMLData routine to populate the control with the contents of the XmlDocument. The GetXMLData routine is the main one in this tutorial, and is listed below.
After the grid has been populated, the routine uses the AutoSizeCol method to adjust the width of the first column based on its contents, and the Show method to expand the outline and show levels 0, 1, and 2. The routine then sets the Redraw property back to True so the grid starts repainting normally.
- The GetXMLData routine is the most interesting one in this tutorial. It traverses the XMLDocument object and builds the outline tree. Add the following code to the form:
To write code in Visual Basic
Visual Basic Copy CodePrivate Sub GetXMLData(ByVal node As System.Xml.XmlNode, ByVal level As Integer) ' Skip the comment nodes. If node.NodeType = System.Xml.XmlNodeType.Comment Then Exit Sub End If ' Add a new row for this node. Dim row As Integer = C1FlexGrid1.Rows.Count C1FlexGrid1.Rows.Add() ' Add data to the new row. C1FlexGrid1(row, 0) = node.Name If node.ChildNodes.Count = 1 Then C1FlexGrid1(row, 1) = node.InnerText C1FlexGrid1.SetCellStyle(row, 1, C1FlexGrid1.Styles("Data")) End If ' If the node has a "Name" subnode, save it to use as a ToolTip. If node.ChildNodes.Count > 0 Then Dim ndName As System.Xml.XmlNode = node.SelectSingleNode("Name") If Not (ndName Is Nothing) Then C1FlexGrid1.Rows(row).UserData = ndName.InnerText End If End If ' If this node has children, get them as well. If node.ChildNodes.Count > 1 Then ' Make this row a node. C1FlexGrid1.Rows(row).IsNode = True C1FlexGrid1.Rows(row).Node.Level = level ' Recurse to get children. Dim child As System.Xml.XmlNode For Each child In node.ChildNodes GetXMLData(child, level + 1) Next End If End SubTo write code in C#
C# Copy Codeprivate void GetXMLData(System.Xml.XmlNode node, int level) { // Skip the comment nodes. if ( node.NodeType == System.Xml.XmlNodeType.Comment ) { return; } // Add a new row for this node. int row = c1FlexGrid1.Rows.Count; c1FlexGrid1.Rows.Add(); // Add data to the new row. c1FlexGrid1[row, 0] = node.Name; if ( node.ChildNodes.Count == 1 ) { c1FlexGrid1[row, 1] = node.InnerText; c1FlexGrid1.SetCellStyle(row, 1, c1FlexGrid1.Styles["Data"]); } // If the node has a "Name" subnode, save it to use as a ToolTip. if (node.ChildNodes.Count > 0) { System.Xml.XmlNode ndName = node.SelectSingleNode("Name"); if (ndName != null) { c1FlexGrid1.Rows[row].UserData = ndName.InnerText; } } // If this node has children, get them as well. if ( node.ChildNodes.Count > 1 ) { // Make this row a node. c1FlexGrid1.Rows[row].IsNode = true; c1FlexGrid1.Rows[row].Node.Level = level; // Recurse to get children. foreach (System.Xml.XmlNode child in node.ChildNodes) GetXMLData(child, level + 1); } }
Observe the following:
The routine starts by skipping XML comment nodes. Then it uses the Rows.Add method to add a new row to the grid.
Next, the routine sets the node name and checks whether the node has exactly one child. In this case, the node is interpreted as a data node, and the node's InnerText property is copied to the second column on the new row. The code also sets the style of cells containing data to the custom style "Data" created when the form was loaded.
The next block of code checks to see whether this node has a subnode called "Name". If it does, then the contents of the "Name" node are assigned to the new row's UserData property. This value will be used later to implement ToolTips, so users can see the node name even when it is collapsed.
Finally, if the node has children, the GetXMLData routine calls itself to add the child nodes to the grid as well.
Run the program and observe the following:
The project can load XML files and display them, and the user can collapse and expand nodes by clicking on them.

The next steps add a few improvements to make the application easier to use.
 Show All
 Hide All