ComponentOne GridView for ASP.NET AJAX is fully compatible with ComponentOne Input for ASP.NET AJAX controls. Using the Input for ASP.NET AJAX controls, you can easily add in data validation to your grid, including masked, date, numeric, percent, and currency editing.
Note: For more information about ComponentOne Input for ASP.NET AJAX, see the Input for ASP.NET AJAX documentation.
In the following steps you'll create template columns in the C1GridView control and add the C1NumericInput and C1CurrencyInput controls to those columns. Note that in the follow steps it is assumed that you have created a C1GridView control and bound it to the Products table of the NorthWind database.
Complete the following steps:
1. Right-click C1GridView and select Show Smart Tag from the context menu. From the C1GridView Tasks menu, select Property builder. The C1GridView Properties dialog box appears.
2. Click the Columns tab in the left pane.
3. In the Selected columns list, remove the following columns by selecting the column and clicking the Delete button: ProductID, SupplierID, CategoryID, UnitPrice, UnitsInStock, UnitsOnOrder, and ReorderLevel.
Note that you'll add template columns to replace most of these columns.
4. In the Available columns list, select Template Field from the list of Available columns.
5. Click the arrow button between the column lists to copy the Template Field to the list of Selected columns. Repeat this step two more times, so that you've added a total of three template columns.
6. Set the HeaderText property for each template column to "Price", "Stock", and "Ordered", respectively.
7. Using the Down arrow button, move the Discontinued column to the bottom of the Selected columns list.
8. Click OK to return to close the C1GridView Properties dialog box and return to the form.
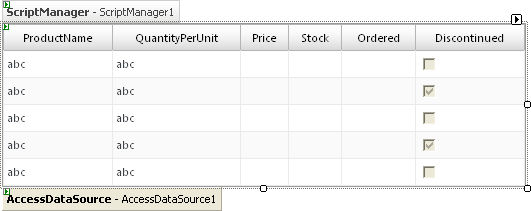
Your page should look similar to the following:
9. Click the C1GridView Smart Tag and select Edit Templates from the C1GridView Tasks menu.
10. Add the C1CurrencyInput control to the Price column:
a. In the C1GridView Tasks menu, click the Display drop-down arrow and under Column[2] – Price, choose Item Template.
b. The Item Template editor appears.
c. Click in the body area of the template, navigate to the Visual Studio Toolbox, and double-click the C1CurrencyInput control to add it to the ItemTemplate.
d. Click the C1CurrencyInput control's smart tag, and select Edit DataBindings from the C1CurrencyInput Tasks menu. This will open the C1CurrencyInput DataBindings dialog box.
e. In the C1CurrencyInput DataBindings dialog box, select Value in the list of Bindable properties, choose the Custom binding radio button, and in the Code expression text box, enter "Convert.ToDouble(Eval("UnitPrice"))".
Note that the last step converts the type so the control can be bound to the value.
f. Click OK to save your settings and close the C1CurrencyInput DataBindings dialog box.
g. Click once on the C1CurrencyInput control to select it and in the Properties window set the Width property to "60px".
11. Add the C1NumericInput control to the Stock column:
a. Click the C1GridView Smart Tag, click the Display drop-down arrow, and under Column[3] – Stock, choose Item Template.
b. Click in the body area of the template, navigate to the Visual Studio Toolbox, and double-click the C1NumericInput control to add it to the ItemTemplate.
c. Click the C1NumericInput control's smart tag, and select Edit DataBindings from the C1NumericInput Tasks menu. This will open the C1NumericInput DataBindings dialog box.
d. In the C1NumericInput DataBindings dialog box, select Value in the list of Bindable properties, choose the Custom binding radio button, and in the Code expression text box, enter "Convert.ToDouble(Eval("UnitsInStock"))".
Note that the last step converts the type so the control can be bound to the value.
e. Click OK to save your settings and close the C1NumericInput DataBindings dialog box.
f. Click once on the C1NumericInput control to select it and in the Properties window set the Width property to "60px".
g. Click the C1NumericInput control's smart tag and, in the C1NumericInput Tasks menu, enter "0" in the DecimalPlaces text box.
12. Add the C1NumericInput control to the Ordered column:
a. Click the C1GridView Smart Tag, click the Display drop-down arrow, and under Column[4] – Ordered, choose Item Template.
b. Click in the body area of the template, navigate to the Visual Studio Toolbox, and double-click the C1NumericInput control to add it to the ItemTemplate.
c. Click the C1NumericInput control's smart tag, and select Edit DataBindings from the C1NumericInput Tasks menu. This will open the C1NumericInput DataBindings dialog box.
d. In the C1NumericInput DataBindings dialog box, select Value in the list of Bindable properties, choose the Custom binding radio button, and in the Code expression text box, enter "Convert.ToDouble(Eval("UnitsOnOrder"))".
Note that the last step converts the type so the control can be bound to the value.
e. Click OK to save your settings and close the C1NumericInput DataBindings dialog box.
f. Click once on the C1NumericInput control to select it and in the Properties window set the Width property to "60px".
g. Click the C1NumericInput control's smart tag and, in the C1NumericInput Tasks menu, enter "200" in the MaxValue text box.
13. Click the C1GridView Smart Tag and select End Template Editing from the C1GridView Tasks menu.
![]() What You've Accomplished
What You've Accomplished
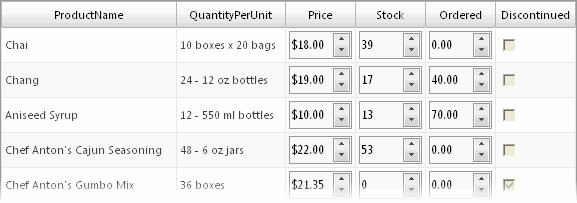
Run your application and observe that the grid now uses ComponentOne Input for ASP.NET AJAX controls in the Price, Stock, and Ordered columns:
|
