In this step you'll begin the quick start by creating a new project and adding the C1GridView control to your project. You'll then bind the C1GridView control to a datasource. Note that in this example, you'll be using the standard Northwind database, Nwind.mdb, installed by default in the ComponentOne Samples\Common folder installed in your MyDocuments folder (Documents in Vista).
Complete the following steps to begin:
1. Create a new ASP.NET Ajax-Enabled Web site project. See Creating an AJAX-Enabled ASP.NET Project for details.
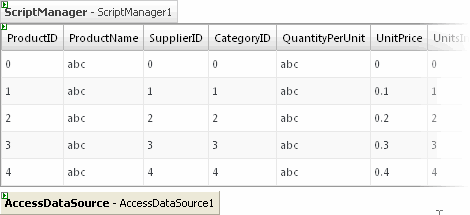
Note that you should have a ScriptManager control on the page.
2. Navigate to the Visual Studio Toolbox and double-click the C1GridView icon to add the control to your project.
3. In the Solution Explorer window, right-click the App_Data folder and select Add Existing Item in the context menu.
4. In the Add Existing Item dialog box, navigate to where the Northwind database is located, by default in the samples directory, select Nwind.mdb, and click Add to close the dialog box and add the file to your project.
5. Click the C1GridView control's smart tag to open the C1GridView Tasks menu.
6. Click the Choose Data Source drop-down arrow, and select <New data source>:
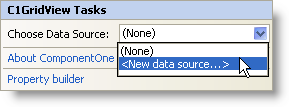
The Data Source Configuration Wizard will open.
7. On the Choose a Data Source Type screen, select Access Database. Leave the default ID entered, AccessDataSource1, and click OK.
8. On the Choose a Database screen, click the Browse button to locate a database.
9. In the Select Microsoft Access Database dialog box, click the App_Data folder in the Project folders list, select the Nwind.mdb file in the Contents of folder pane, and click OK.
10. The Nwind.mdb database should now be listed on the Choose a Database screen. Click Next to continue.
11. On the Configure the Select Statement screen, confirm that the Specify columns from a table or view radio button is selected, under name choose Products from the drop-down list, and in the Columns pane choose the asterisk (*) check box to select all the columns. Click Next to continue.
12. You can test the query on the Test Query page, and select Finish to close the wizard and complete binding the grid.
Note that the grid columns now reflect the datasource:
That's all you need to do to create a simple grid application! The grid is now bound Northwind database. If you run your project now, you'll have a fully-functional grid application where you can interact with data in a tabular form and you'll be able to access and interact with the data from the Products table of the database. In the next steps of this quick start you'll customize the grid's appearance and behavior and explore the grid's run-time interactions.
|
