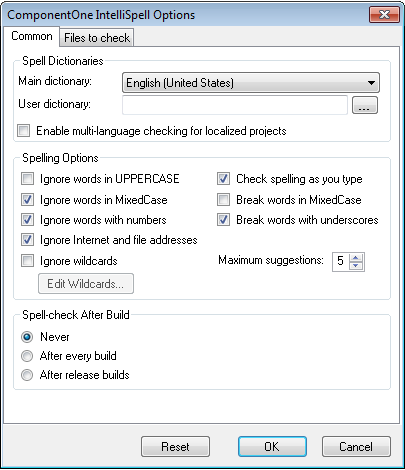
ComponentOne IntelliSpell is a flexible tool. You can configure it using the Options command (available on the ComponentOne IntelliSpell menu, toolbars, and Task List). The command shows the ComponentOne IntelliSpell Options dialog box, which looks like this:
The dialog box is divided into two tabs: Common and Files to check.
First tab: Common
The common tab is divided into the following three sections:
Spell Dictionaries:
This section allows you to set which dictionary to use with an additional multi-language spell-checking option. Available options include:
•Main Dictionary
Selects the default dictionary to use for spell
checking your applications. The default dictionary is American English, but
there are 20 other options, including Spanish, French, German, Italian,
Portuguese, Russian, Dutch, and Greek.
•User dictionary
Selects the file used to store custom words
that should be ignored by the spell checker. You can add words to the dictionary
by clicking the Add button in the ComponentOne IntelliSpell
window.
•Enable multi-language checking for localized projects
If you
check this option, ComponentOne IntelliSpell will automatically switch
dictionaries when spell checking resource files. To create localized projects,
set the Localized property on the forms to true, and then switch the
Language property to create resources in as many additional languages as
you want.
Spelling Options:
Set spelling options, including:
•Ignore…
This section allows you to select types of words that
should be skipped, such as words in mixed case, all uppercase, with numbers,
wildcards, or words that look like URLs or file names. If you select the
Ignore wildcards checkbox you can click on the Edit Wildcards…
button to enter wildcard expressions for the spell-checker to ignore.
•Maximum suggestions
This option allows you to select the
maximum number of suggestions to display for each misspelled word. Suggestions
appear in context-sensitive menus and also in the ComponentOne
IntelliSpell tool window.
•Check spelling as you type
Check this checkbox to enable
as-you-type spell checking. Misspelled words are underlined with a wavy
underline as you type them.
•Break words in MixedCase
This option enables you to split and
check words in mixed case such as “SomeWord” or “Some” “Word”.
•Break words with underscores
This option enables you to split
words with underlines. For example, “Some_Word” -> “Some” “Word”.
Spell-check After Build:
This section allows you to automatically invoke the spell checker after building the project. Available options include:
•Never
Do not automatically spell-check the project after
building it.
•After every build
Automatically spell-check the project after
every build.
•After release builds
Spell-check the project automatically
after every build that contains the word "Release" in its name.
Second tab: Files to Check
The Files to Check tab appears like the following:

The Files to check tab includes the following types of files:
•C# Like Languages
Spell-checks the strings, comments, and xml
comments in C# files. It includes the following sub-items:
•Code Elements to Check
Determines which elements in the file will be
spell-checked.
•Enabled
Determines whether files of this type will be
spell-checked.
•File Extensions to Check
Determines which file elements will be
checked using these settings.
•CSS Files
Spell checks CSS files. It includes the following
sub-items:
•Enabled
Determines whether files of this type will be
spell-checked.
•File Extensions to Check
Determines which file elements will be
checked using these settings.
•Html Files
Spell checks HTML files such as .ascx, .aspx, .htm,
.html, .and master. It includes the following sub-items:
•JavaScript blocks
Determines the settings for the JavaScript blocks.
It includes the following sub-items:
•Enabled
Determines whether files of this type will be
spell-checked.
•Code elements to check
Determines which elements in the file will be
spell-checked.
•File extensions to check
Determines which file elements will be
checked using these settings.
•Attributes to check
Determines which XML attributes will have their
values spell checked. To add more xml attributes to check, click the ellipsis
button to open the XML Attributes Editor dialog box. Add the XML
attributes one per line and then click OK.
•Enabled
Determines whether files of this type will be
spell-checked.
•File Extensions to Check
Determines which file elements will be
checked using these settings.
•Resource Files
Spell-checks resource files. It includes the
following sub-items:
•Enabled
Determines whether files of this type will be
spell-checked.
•File Extensions to Check
Determines which file elements will be
checked using these settings.
•Text Files
Spell-checks plain text files in the project
(typically readme.txt files). It includes the following sub-items:
•Enabled
Determines whether files of this type will be
spell-checked.
•File Extensions to Check
Determines which file elements will be
checked using these settings.
•Visual Basic Files
Spell-checks the strings, comments, and xml
comments in Visual Basic files. It includes the following sub-items:
•Code Elements to Check
Determines which elements in the file will be
spell-checked
•File Extensions to Check
Determines which file elements will be
checked using these settings.
•Enabled
Determines whether files of this type will be
spell-checked.
•Xml Files
Spell-checks XML, XAML, and config files. It includes
the following sub-items:
•Attributes to check
Determines which XML attributes will have their
values spell checked. To add more xml attributes to check, click the ellipsis
button to open the XML Attributes Editor dialog box. Add the XML
attributes one per line and then click OK.
•Enabled
Determines whether files of this type will be
spell-checked.
•File Extensions to Check
Determines which file elements will be
checked using these settings.