In this topic, you will add C1TabBarController to C1ViewPort's toolbar in Design view and in Source view. This topic assumes that you have created an AJAX-enabled ASP.NET project that contains a ScriptManager control (see Creating an AJAX-Enabled ASP.NET Project).
In Design View
Complete the following steps:
1. In the Toolbox, double-click the C1ViewPort icon to add the control to your page.
2. Click C1ViewPort's toolbar.
Your cursor appears in C1ViewPort's toolbar.
3. In the Toolbox, double-click the C1TabBarController icon to add the control to your page.
In Source View
Complete the following steps:
1. Click the Source tab to enter Source view.
2. Place your cursor above the </form> tag, navigate to the Toolbox, and double-click the ScriptManager icon to add the control to your page.
3. Place your cursor between the <div> and </div> tags, navigate to the Toolbox, and double-click the C1ViewPort icon to add the control to your page.
4. Enter the following markup between the <cc1:C1ViewPort> and </cc1:C1ViewPort> tags:
<Toolbar></Toolbar>
5. Place your cursor between the <Toolbar> and </Toolbar> tags.
6. In the Toolbox, double-click C1TabBarController to add the control to your project.
C1TabBarController is added to C1ViewPort's toolbar. The markup will resemble the following:
<cc1:C1ViewPort ID="C1ViewPort1" runat="server">
<ToolBar>
<cc2:C1TabBarController ID="C1TabBarController1" runat="server" Width="100%">
</cc2:C1TabBarController>
</ToolBar>
</cc1:C1ViewPort>
Note: Observe that the Width property is set to 100% in the above markup; this will allow the tab strip to span the entire width of the toolbar.
7. Save the project and open it in a Studio for iPhone-compatible browser.
 This Topic
Illustrates the Following:
This Topic
Illustrates the Following:
The following image depicts a C1TabBarController nested in the toolbar of the C1ViewPort control:
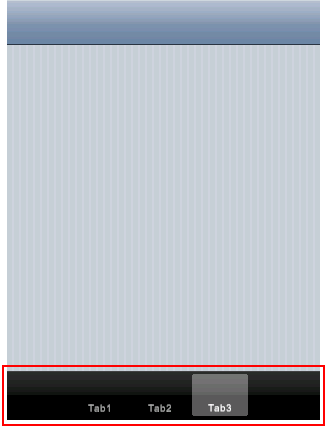
Please note that this image also shows tabs on the C1TabBarController control. To learn how to add these tabs, see Adding Tabs to C1TabBarController.