Image
Filename

Click_40x40.png

Focused_40x40.png

UnFocused_40x40.png
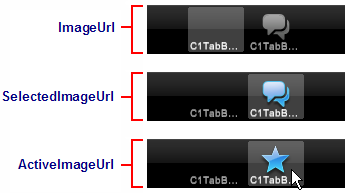
Each C1TabBarItem has three properties that govern tab images: ImageUrl, SelectedImageUrl, and ActiveImageUrl. The ImageUrl property sets the path of the image that will appear along with the tab's text. That image will remain stationary unless you set one or both of the other two image properties, SelectedImageUrl and ActiveImageUrl. The SelectedImageUrl property sets the image that appears when the tab is selected, while the ActiveImageUrl property sets the image that appears when the tab is clicked. In this topic, you will set each image to a different property and observe the effects of each setting on a tab.
This topic requires that you use three different 40x40 images. You can use the three in the table below by right-clicking on each image, selecting Save Image As from the context menu, and then saving the file to the name specified in the table.
|
Image |
Filename |
|
|
Click_40x40.png |
|
|
Focused_40x40.png |
|
|
UnFocused_40x40.png |
Complete the following steps:
1. Click the Design tab to enter Design view.
2. In the Toolbar, double-click the ScriptManager icon to add the control to your project.
3. In the Toolbar, double-click the C1TabBarController icon to add the control to your project.
4. In the Solution Explorer, right-click the project to bring up its context menu and select New Folder. Name the new folder "Images".
5. Right-click the Images folder and select Add Existing Image.
The Add Existing Image dialog box opens.
6. Navigate to the folder holding your three images, select each image, and then click Add to add the images to the project.
7.
In Design view, click C1TabBarController's
smart tag ( ) to open the
C1TabController Tasks menu and then select TabBarController
Designer.
) to open the
C1TabController Tasks menu and then select TabBarController
Designer.

The C1TabBarController Designer Form opens.
8.
Click the Add Child Item button  to add two tabs to the control.
9. In the treeview, select C1TabBarItem02 to bring its properties into focus and then set the following properties:
•Set the ImageUrl property to "~/Images/UnFocused_40x40.png".
•Set the ActiveImageUrl property to "~/Images/Click_40x40.png".
•Set the SelectedImageUrl property to "~/Images/Focused_40x40.png".
10. Press OK to close the C1TabBarController Designer Form.
11. Save the project and open it in a Studio for iPhone-compatible browser. When the project loads, C1TabBarItem02 will show an image of a gray dialogue bubble. If you select that tab, it will change to a blue dialogue bubble. Now click the tab with your cursor and observe that the image changes into the blue star.