The following topic illustrates how to add items to the content area of a C1LaunchPad control in Design view, in Source view, and in code. This topic assumes that you have created an AJAX-enabled ASP.NET project that contains a ScriptManager control (see Creating an AJAX-Enabled ASP.NET Project) and a C1LaunchPad control.
Note: To complete this topic, you will have to add at least one page to the C1LaunchPad control. Please complete Adding a Page to the C1LaunchPad Control before starting this topic.
In Design View
Complete the following steps:
1. Add an image to your project by completing the following steps:
a. In Solution Explorer, right-click the project's name to open its context menu and select New Folder. Name this folder "Images".
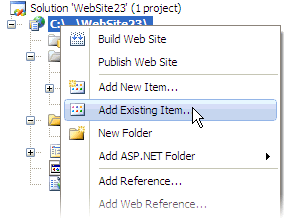
b. Right-click the Images folder and select Add Existing Item from the context menu.
The Add New Item dialog box appears.
c. Navigate to the location of the Studio for iPhone sample (C:\Program Files\ComponentOne Studio for iPhone/Samples/quickstart) and open the Images folder.
d. In the Images folder, select mail_57x57.png and click Add.
e. The graphic mail_57x57.png is added to the Images folder.
2.
Click C1LaunchPad's
smart tag ( ) to open the C1LaunchPad
Tasks menu and select C1LaunchPad Designer.
) to open the C1LaunchPad
Tasks menu and select C1LaunchPad Designer.
The C1LaunchPad Designer Form opens.
3. With Pages selected in treeview, click the Add Child Item drop-down arrow and select LaunchPage.
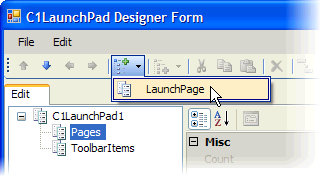
C1LaunchPage01 is added to the project.
4. With C1LaunchPage01 selected in treeview, click the Add Child Item drop-down arrow, and select LaunchPadItem.
C1LaunchPadItem01 is added to the project.
5. Select C1LaunchPadItem01 and set its properties as follows:
•Set the Text property to "New Item".
•Set the ImageUrl property to "Images/mail_57x57.png".
6. Click OK to close the C1LaunchPad Designer Form.
7. Save the project and open it in a Studio for iPhone-compatible browser.
In Source View
To add a launch item to the C1LaunchPad control, complete the following:
1. Complete step 1 under "Adding Launch Items in the Designer" to add an image to your project.
2. Click the Source tag to enter Source view and then place the following XHTML between the
<cc1:C1LaunchPage> tags:
<Items>
<cc1:C1LaunchPadItem runat="server" ID="LaunchItem" Text="New Item" ImageUrl="mail_57x57.png" />
</Items>
3. Save the project and open it in a Studio for iPhone-compatible browser.
In Code
To add launch items to the C1LaunchPad control, complete these steps:
1. Complete step 1 under "Adding Launch Items in the Designer" to add an image to your project.
2. Double-click the project to enter Code view.
3. Import the following namespace into your project:
Imports C1.Web.iPhone.C1LaunchPad
•C#
using C1.Web.iPhone.C1LaunchPad;
4. Create the launch item object by adding the following code to the Page_Load event:
Dim LaunchItem As New C1LaunchPadItem()
•C#
C1LaunchPadItem LaunchItem = new C1LaunchPadItem();
5. Set the Text and ImageUrl properties of the new launch item by adding the following code to the Page_Load event:
LaunchItem.Text = "New Item"
LaunchItem.ImageUrl = "Images/mail_57x57.png"
•C#
LaunchItem.Text = "New Item";
LaunchItem.ImageUrl = "Images/mail_57x57.png";
6. Add the new launch item to the C1LaunchPage by adding the following code to the Page_Load event:
C1LaunchPage1.Items.Add(LaunchItem)
•C#
C1LaunchPage1.Items.Add(LaunchItem);
7. Save the project and open it in a Studio for iPhone-compatible browser.
 This Topic
Illustrates the Following:
This Topic
Illustrates the Following:
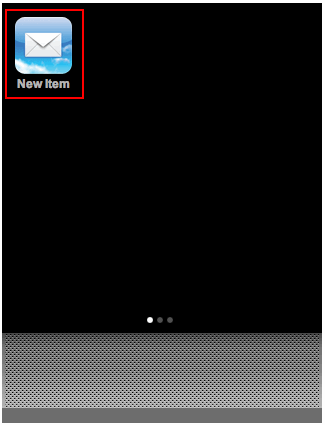
The following image shows the C1LaunchPadItem that you added to the content area of the C1LaunchPad control: