
In this topic, you will learn how to bind the C1NavigationList control to a site map data source. This topic assumes that you have created an AJAX-enabled ASP.NET project that contains a ScriptManager control (see Creating an AJAX-Enabled ASP.NET Project) and a C1NavigationList control.
Complete the following steps:
1. Click the Design tab to enter Design view.
2. In Solution Explorer, right-click the project to open its context menu and select Add New Item.
The Add New Item dialog box appears.
3. Select SiteMap from the templates list and click OK to add the site map file to your project.
4. Replace the markup in the site map file with the following markup:
<?xml version="1.0" encoding="utf-8" ?>
<siteMap xmlns="http://schemas.microsoft.com/AspNet/SiteMap-File-1.0" >
<siteMapNode url="" title="Movies" description="Movies for sale" >
<siteMapNode url="" title="80s Movies" >
<siteMapNode url="" title="Blade Runner" description="1982. Deckard, a blade runner, has to track down and terminate 4 replicants who hijacked a ship in space and have returned to Earth seeking their maker."/>
<siteMapNode url="" title="Indiana Jones and the Temple of Doom" description="1984. After arriving in India, Indiana Jones is asked by a desperate village to find a mystical stone. He agrees, and stumbles upon a secret cult plotting a terrible plan in the catacombs of an ancient palace." />
<siteMapNode url="" title="Star Wars Episode IV: The Empire Strikes Back" description="1980. Harrison Ford devises a plan to star in every 80s action flick. The goal? To rule the universe!" />
</siteMapNode>
<siteMapNode url="" title="90s Movies">
<siteMapNode url="" title="Star Wars Episode I: The Phantom Menace" description="1999.Every generation has a legend. Every journey has a first step. Every saga has a beginning. " />
<siteMapNode url="" title="Fight Club" description="1999. An office employee and a soap salesman build a global organization to help vent male aggression. " />
</siteMapNode>
</siteMapNode>
</siteMap>
5. Return to the .aspx page and click the Design tab to enter Design view.
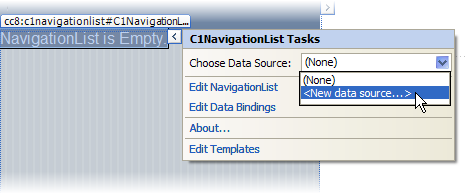
6.
Click C1NavigationList's
smart tag ( ) to open the
C1NavigationList Tasks menu.
) to open the
C1NavigationList Tasks menu.
7. Click the Choose Data Source drop-down arrow and select New data source.
The Data Source Configuration Wizard dialog box opens.
8. Select Site Map and then click OK to close the Data Source Configuration Wizard dialog box.
9. Save the project and open it in a Studio for iPhone-compatible browser. Observe that the site map has populated the C1NavigationList control's item list.