 )
to open the C1PickerView Tasks menu and then select C1PickerView
Designer.
)
to open the C1PickerView Tasks menu and then select C1PickerView
Designer.When a user spins a picker list, the client-side OnClientSelectedIndexChanged event is fired. You can then use the value of the SelectedItemValue property to determine which option the user selected. In this topic, you will check for the value of the Checked property when the OnSelectedIndexChanged event is fired; the value of the SelectedItemValue property will then determine which string is set to the Text property of a standard Label control.
Complete the following steps:
1. Click the Design tab to enter Design view.
2. From the Toolbox, add a C1PickerView control, a ScriptManager control, and a standard Label control to your project.
3.
Click C1PickerView's smart tag ( )
to open the C1PickerView Tasks menu and then select C1PickerView
Designer.
The C1PickerView Designer Form opens.
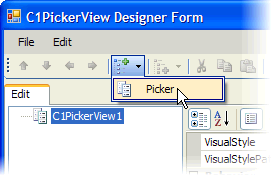
4. Click the Add Child Item drop-down arrow and select Picker to add a picker list to the control.

Picker01 is added to treeview.
5. In treeview, select Picker01 and then click the Add Child Item drop-down arrow and select Item to add an item to the control. Repeat twice.
Item01, Item02, and Item03 are added treeview.
6. Set the Value property of each of the new items as follows:
•Item01 – "1"
•Item02 – "2"
•Item03 – "3"
7. Click OK to close the C1PickerView Designer Form.
8. Click the Source tab to switch to Source view.
9. Now you're going to create a client-side script that checks for the value of the SelectedItemValueproperty and then sets the text of the Label control to a different string according to the property's value. To complete this task, place the following script after the </asp:ScriptManager> tag:
<script type="text/javascript" id="ComponentOneClientScript">
function C1PickerView1_OnClientSelectedIndexChanged(args) {
var oPickerView = Sys.Application.findComponent("<%=C1PickerView1.ClientID%>");
var oSelectedPickerItem = oPickerView.getSelectedItemValue("Picker01");
if (oSelectedPickerItem == 1) {
document.getElementById("Label1").innerHTML = "First Item";
}
else if (oSelectedPickerItem == 2) {
document.getElementById("Label1").innerHTML = "Second Item";
}
else if (oSelectedPickerItem == 3) {
document.getElementById("Label1").innerHTML = "Third Item";
}
};
</script>
Note: In order for this script to work, the Label control's ID property must be set to "Label1".
10. Add onclientselectedindexchanged="C1PickerView1_OnClientSelectedIndexChanged" to the <cc1:C1PickerView> tag so that the markup resembles the following:
<cc1:C1PickerView ID="C1PickerView1" runat="server"
onclientselectedindexchanged="C1PickerView1_OnClientSelectedIndexChanged">
11. Save the project and open it in a Studio for iPhone-compatible browser.
12. Spin the picker to Item02 and observe that the text of the Label control reads "Second Item".
13. Spin the picker to Item03 and observe that the text of the Label control reads "Third Item".
14. Spin the picker to Item01 and observe that the text of the Label control reads "First Item".