Using C1SegmentedButtons to Toggle Between
States
You can use the C1SegmentedButtons
control to toggle between two states. In this topic, you'll write a client-side
script that will allow users to toggle the visibility of a C1NavigationList
control. This topic assumes that you have created an AJAX-enabled ASP.NET
project that contains a ScriptManager control (see Creating an AJAX-Enabled ASP.NET
Project).
 Sample Project Available: For a
complete sample showing how to use the C1SegmentedButtons control to
toggle between states, see the sample located, by default, in the Studio for
iPhone installation directory (see Studio for iPhone Samples for a list of
directories). The sample is named SegmentedButtonsAndLeftButton.
Sample Project Available: For a
complete sample showing how to use the C1SegmentedButtons control to
toggle between states, see the sample located, by default, in the Studio for
iPhone installation directory (see Studio for iPhone Samples for a list of
directories). The sample is named SegmentedButtonsAndLeftButton.
Step 1: Adding the C1SegmentedButtons Control to
C1ViewPort's Toolbar
Complete the following steps:
1.
Click the Source tab to enter Source view.
2.
Place your cursor between the <form> and
</form> tags.
3.
From the Toolbox, add a C1ViewPort
control and a ScriptManager control to your project.
4.
Enter the following tags between the <cc1:C1ViewPort> and </cc1:C1ViewPort> tags:
<ToolBar></ToolBar>
5.
Place your cursor between the <Toolbar> and
</Toolbar> tags, navigate to the Visual
Studio Toolbox, and then double-click C1SegmentedButtons
to add it to the toolbar of the C1ViewPort
control. The markup will resemble the following:
<cc2:C1SegmentedButtons
ID="C1SegmentedButtons1" runat="server">
</cc2:C1SegmentedButtons>
6.
Enter the following markup between the <cc1:C1SegmentedButtons> and </cc1:C1SegmentedButtons> tags:
<Buttons>
<cc2:C1SegmentedButton ID="C1SegmentedButton1" runat="server"
ButtonType="Standard" Text="Display On"
OnClientClick="onClick_DisplayOn"/>
<cc2:C1SegmentedButton ID="C1SegmentedButton2" runat="server"
ButtonType="Standard" Text="Display Off"
OnClientClick="onClick_DisplayOff" />
</Buttons>
7.
Note that the OnClientClick property of each button is set to a method
name. You will write these methods in a later step.
Step 2: Adding a C1Navigation List to C1ViewPort's
Content Area
Complete the following steps:
1.
Click the Design tab to switch to Design view.
2.
Place your cursor in the content area of the C1ViewPort
control, navigate to the Visual Studio Toolbox, and then double-click C1NavigationList
to add it to the content area of the C1ViewPort
control.
3.
Click C1NavigationList's
smart tag ( ) to open the
C1NavigationList Tasks menu and select Edit NavigationList.
) to open the
C1NavigationList Tasks menu and select Edit NavigationList.
The
C1NavigationList Designer Form opens.
4.
Click the Add Child Item button  three times to add three navigation list
items to the control.
three times to add three navigation list
items to the control.
5.
Click OK to close the C1NavigationListDesigner Form.
Step 3: Adding Client-Side Script to the Project
Complete the following steps:
1.
Click the Source tab to enter Source view.
2.
Place the following script, which creates methods for turning the display on and
turning the display off, after the <body>
tag:
<script language="javascript"
type="text/javascript">
function
onClick_DisplayOn() {
var
navListNew =
Sys.Application.findComponent("<%=C1NavigationList1.ClientID%>");
navListNew.set_displayVisible(true);
}
function
onClick_DisplayOff() {
var
navListNew =
Sys.Application.findComponent("<%=C1NavigationList1.ClientID%>");
navListNew.set_displayVisible(false);
</script>
Step 4: Running the Project
Complete the following steps:
1.
Open the project in a Studio for iPhone-compatible browser and press the
Display Off button. Observe that the C1NavigationList
disappears.
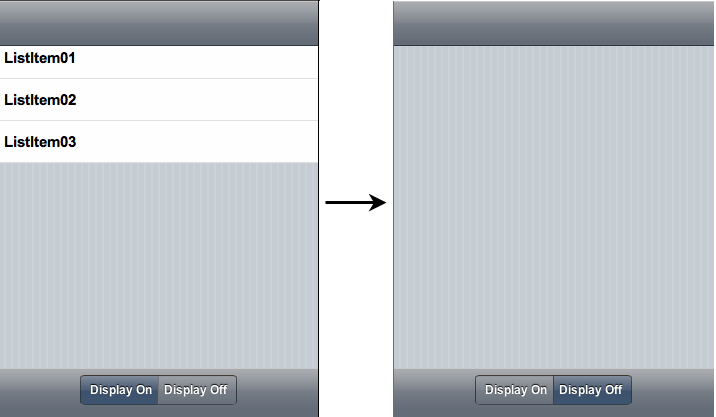
2.
Click the Display On button; the navigation list items become visible
again.