In this lesson you'll learn how to bind C1Menu to a SiteMapDataSource, XMLDataSource, and an AccessDataSource.
Bind C1Menu to an XMLDataSource
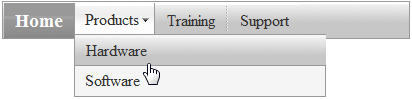
This lesson shows you how to create an XML file through Visual Studio 2008 installed templates, add the XML Data Source component to the Web site, and assign it to C1Menu, and then set the binding for the C1Menu.
The final application will appear like the following at run time:
To create an XML file and bind it to C1Menu, add the XMLDataSource component to the Web site, and then assign it to the C1Menu control.
1. Start a new AJAX 1.0-Enabled ASP.NET 2.0 Web Site project.
2. Right-click on the App_Data in the Solution Explorer and select Add New Item. The Add New Item dialog box appears.
3. Select the XML File and rename it Menu.xml.
4. Click on the Add button in the Add New Item dialog box.
5. Switch to the XML view and add the following data to the Menu.xml:
<?xml version="1.0" encoding="utf-8" ?>
<root>
<menuitem Text="Home" IsHeader=”true”>
</menuitem>
<menuitem Text="Products">
<menuitem Text="Hardware">
</menuitem>
<menuitem Text="Software">
</menuitem>
</menuitem>
<menuitem Text="Services" IsGroup=”true”>
<menuitem Text="Training">
</menuitem>
<menuitem Text="Consulting" IsSeparator=”true”>
</menuitem>
<menuitem Text="Support">
</menuitem>
</menuitem>
</root>
Note: Notice how the <menuitem> tags are indented for the sub-menu items.
6. Switch back to the .aspx page and select the Design tab to switch to Design view.
7. Expand the Data node in the Visual Studio Toolbox and double-click on the XmlDataSource component to add it to the Web page.
8. Select the XmlDataSource1 on the Web Page and navigate to its Properties window.
9. Click on the ellipsis button next to the DataFile property to open the Select XML File dialog box. Select the App_Data and click on the Menu.xml file. Click OK to add it to the XmlDataSource1.DataFile property.
10. Set the XmlDataSource1.Xpath property to” root/menuitem”.
11. Double-click on the C1Menu control from the Visual Studio Toolbox to add it to your page.
12. Open the C1Menu control's Tasks menu and select XmlDataSource1 from the Choose Data Source drop-down listbox

13. Click on the Source tab to switch to your source page and add the following DataBinding tags within the C1Menu tags.
<DataBindings>
<cc1:C1MenuItemBinding DataMember="menuitem" TextField="Text" GroupField=”IsGroup” HeaderField=”IsHeader” SeparatorField=”IsSeparator”/>
</DataBindings>
Note: Two key properties are the DataMember and TextField. The DataMember sets the data member from the xml file to bind to the C1Menu. The TextField gets the value of the Text property of a C1MenuItem object to which the C1MenuItemBinding object is applied.
14. Toggle back to the Design view and select Edit Menu Bindings from the C1Menu Tasks menu.
Notice the DataMember, menuitem, is added to the C1MenuItemBindingCollection and the C1MenuItemBinding properties appear in the property grid so you can easily modify the settings for the menuitem object.
15. Save and build your project. Observe the following at run time:
• The data from the menu.xml file is reflected in the C1Menu control.
Bind C1Menu to a SiteMapDataSource
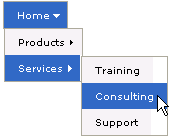
This lesson shows you how to create a Site Map through the Visual Studio 2005 installed templates, add the SiteMapDataSource component to the Web page and assign it to C1Menu, then set the binding for the C1Menu.
The SiteMapDataSource control enables you to view navigation information in your Web application. You can use the C1Menu control with the SiteMapDataSource.
The final application will appear like the following at run time:
To create the Site Map and bind it to the C1Menu control, complete the following:
1. Create a new ASP.NET AJAX-Enabled Web Site.
2. Right-click on your project's name in the solution explorer and select Add New Item. The Add New Item dialog box appears. Select Site Map from the list of templates, and then click Add to add the new Web.sitemap item to the project.
The following default source code appears for the Web.sitemap file:
<?xml version="1.0" encoding="utf-8" ?>
<siteMap xmlns="http://schemas.microsoft.com/AspNet/SiteMap-File-1.0" >
<siteMapNode url="" title="" description="">
<siteMapNode url="" title="" description="" />
<siteMapNode url="" title="" description="" />
</siteMapNode>
</siteMap>
3. Replace the default data with the following data for the Web.sitemap file:
<siteMap>
<siteMapNode title="Home" description="Home" url="~/default.aspx">
<siteMapNode title="Products" description="Our products"
url="~/Products.aspx">
<siteMapNode title="Hardware" description="Hardware choices"
url="~/Hardware.aspx" />
<siteMapNode title="Software" description="Software choices"
url="~/Software.aspx" />
</siteMapNode>
<siteMapNode title="Services" description="Services we offer"
url="~/Services.aspx">
<siteMapNode title="Training" description="Training classes"
url="~/Training.aspx" />
<siteMapNode title="Consulting" description="Consulting services"
url="~/Consulting.aspx" />
<siteMapNode title="Support" description="Supports plans"
url="~/Support.aspx" />
</siteMapNode>
</siteMapNode>
</siteMap>
4. Toggle back to the design view for the .aspx page. Select the Data tab in the Visual Studio Toolbox and add the SiteMapDataSource component to the Web page using a drag-and-drop operation.
5. Double-click on the C1Menu control from the Visual Studio Toolbox to add it to your page.
6. Open the C1Menu control's Tasks menu and select New Data Source from the Choose Data Source drop-down listbox. The Data Source Configuration Wizard dialog box appears.
7. Select the Site Map and keep the ID as SiteMapDataSource1. Click OK.
C1Menu automatically updates at design time with the data from the Web.sitemap file.
8. Save and build your project. Observe the following at run time:
• The data from the Web.sitemap file is reflected in the C1Menu control.
Bind C1Menu to an AccessDataSource
This lesson shows you how to bind C1Menu to a DataView by using the AccessDataSource to connect the Microsoft Access DataBase file to the C1Menu control and then using code to create the hierarchy for the C1Menu control. The hierarchy is created by using ID->ParentID relation.
Once the C1Menu control is bound, the hierarchy is determined, you can set the Text, NavigateUrl, and ToolTip properties.
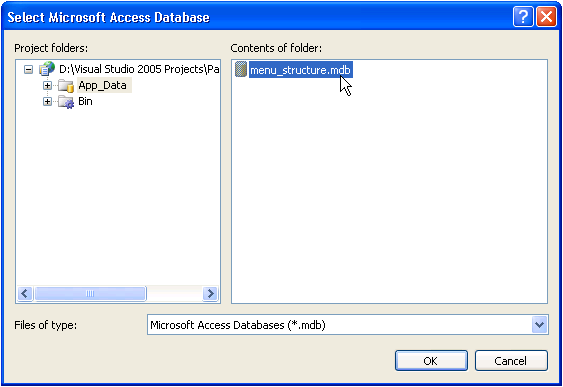
Note: The menu uses data from the sample Access database, menu_structure.mdb, included in the ControlExplorer Visual Studio 2005 sample project.
The final application will appear like the following at run time:
To bind the C1Menu control to the DataView, complete the following:
1. Create a new ASP.NET AJAX-Enabled Web Site.
2. Copy the menu_structure.mdb database file from the App_Data folder from the ControlExplorer sample project to the App_Data folder in your project.
3. Save and close the project then reopen it so you'll see that the menu_structure.mdb file appears in your App_Data folder.
4. Expand the Data node in the Visual Studio Toolbox and add the AccessDataSource component to the Web page using a drag-and-drop operation.
5. Select the AccessSource1 from the drop-down listbox in the Properties window.
6. Click on the ellipsis button next to the DataFile property to open the Select Microsoft Access Database dialog box. Select the App_Data and click on the menu_structure.mdb file. Click OK to add it to the AccessSource1.DataFile property.
7. Toggle to Source view and add the SelectCommand to retrieve the data from the Menu_Items table.
<asp:AccessDataSource ID="AccessDataSource1" runat="server" DataFile="~/App_Data/menu_structure.mdb"
SelectCommand="SELECT * FROM [MENU_ITEMS]"></asp:AccessDataSource>
8. Add the C1Menu control to your page.
9. To specify the namespaces used in this example, add the following statements before any declarations in the Code Editor:
Imports System.Data
Imports C1.Web.UI.Controls.C1Menu
• C#
using C1.Web.UI.Controls.C1Menu;
10. Add the following code in your code behind page to connect the C1Menu control to the AccessDataSource, select the DataView, establish hierarchy and set the Text, NavigateUrl, and ToolTip properties:
Protected Sub Page_Load(ByVal sender As Object, ByVal e As EventArgs)
CreateMenuItemsFromAccessDataSourceExample(C1Menu1, Me.AccessDataSource1)
End Sub
Protected Sub CreateMenuItemsFromAccessDataSourceExample(ByVal menu As C1Menu, ByVal dataSource As SqlDataSource)
' Select DataView:
Dim dsArgs As New DataSourceSelectArguments()
Dim dataView As DataView = TryCast(dataSource.[Select](dsArgs), DataView)
' sort by parent ID:
dataView.Sort = "ParentMenuItemID"
' Clear old menu items:
menu.Items.Clear()
' Create Menu Items according MenuItemID/ParentMenuItemID relationship.
Dim menuItemsDict As New Dictionary(Of String, C1MenuItem)()
For i As Integer = 0 To dataView.Count - 1
Dim row As DataRow = dataView(i).Row
Dim item As C1MenuItem = CreateMenuItem(row)
Dim itemID As String = row("MenuItemID").ToString()
Dim parentID As String = row("ParentMenuItemID").ToString()
menuItemsDict.Add(itemID, item)
If parentID = "" Then
' this is root menu item, add it to menu:
menu.Items.Add(item)
Else
If menuItemsDict.ContainsKey(parentID) Then
' this is child menu item, add it to parent menu item:
menuItemsDict(parentID).Items.Add(item)
End If
End If
Next
End Sub
Private Function CreateMenuItem(ByVal row As DataRow) As C1MenuItem
Dim c1MenuItem As New C1MenuItem()
c1MenuItem.Text = row("MenuItemText").ToString()
c1MenuItem.NavigateUrl = row("MenuItemUrl").ToString()
c1MenuItem.ToolTip = row("MenuItemToolTip").ToString()
Return c1MenuItem
End Function
• C#
protected void Page_Load(object sender, EventArgs e)
{
CreateMenuItemsFromAccessDataSourceExample(C1Menu1, this.AccessDataSource1);
}
protected void CreateMenuItemsFromAccessDataSourceExample(C1Menu menu, SqlDataSource dataSource)
{
// Select DataView:
DataSourceSelectArguments dsArgs = new DataSourceSelectArguments();
DataView dataView = dataSource.Select(dsArgs) as DataView;
// sort by parent ID:
dataView.Sort = "ParentMenuItemID";
// Clear old menu items:
menu.Items.Clear();
// Create Menu Items according MenuItemID/ParentMenuItemID relationship.
Dictionary<string, C1MenuItem> menuItemsDict = new Dictionary<string, C1MenuItem>();
for (int i = 0; i < dataView.Count; i++)
{
DataRow row = dataView[i].Row;
C1MenuItem item = CreateMenuItem(row);
string itemID = row["MenuItemID"].ToString();
string parentID = row["ParentMenuItemID"].ToString();
menuItemsDict.Add(itemID, item);
if (parentID == "")
{
// this is root menu item, add it to menu:
menu.Items.Add(item);
}
else
{
if (menuItemsDict.ContainsKey(parentID))
{
// this is child menu item, add it to parent menu item:
menuItemsDict[parentID].Items.Add(item);
}
}
}
}
private C1MenuItem CreateMenuItem(DataRow row)
{
C1MenuItem c1MenuItem = new C1MenuItem();
c1MenuItem.Text = row["MenuItemText"].ToString();
c1MenuItem.NavigateUrl = row["MenuItemUrl"].ToString();
c1MenuItem.ToolTip = row["MenuItemToolTip"].ToString();
return c1MenuItem;
}
11. Run and save your project. Observe the following at run-time:
• The data is bound to the C1Menu control.
|