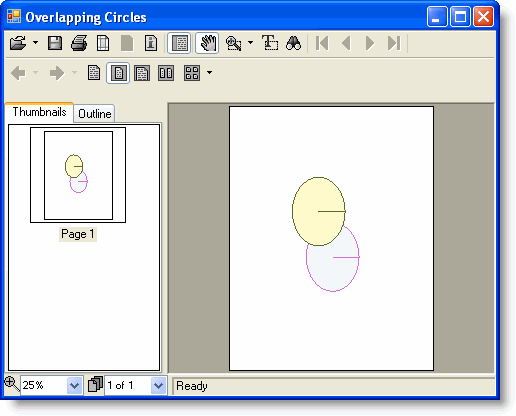
Drawing two overlapping circles demonstrates how to use the RenderDirectPie method to draw two circles. The circles are sized according to the current page size retrieved via the BodyAreaSize property. This topic also shows how to use the C1DocStyle class to create styles for each circle.
1. Create a new Windows Forms application. Drag and drop a C1PrintPreview control onto your form. Drag and drop a C1PrintDocument component onto your form – it will appear in the components' tray below the form. The preview will have the default name c1PrintPreview1, the document c1PrintDocument1. Set the value of the Document property of c1PrintPreview1 control to c1PrintDocument1, so that the preview will show the document when the application runs. Double click on the form to create a handler for the Form_Load event. In that handler we will add a call to the GenerateDoc method (which we will write in step 4), where all code shown in this topic will be written.
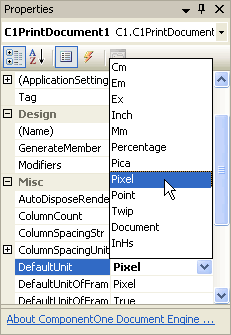
2. Change C1PrintDocument1's default unit from inches to pixels at design-time in the Properties window.

3. In the Form_Load event handler, call the GenerateDoc procedure (which we will write in the next step), that will actually create the document:
GenerateDoc()
• C#
GenerateDoc();
4. Create a procedure for the GenerateDoc method called in the Form1_Load procedure. In the GenerateDoc procedure, create and set up two different styles for the circles that you will be creating.
We will use the C1DocStyle class to create the styles for the circles. Create a variable called PieStyle1 to hold the first style. Next, create a LineDef for the first circle. Its color will be orchid and it will be three points thick. Assign the new LineDef to the ShapeLine property of the style – that way it will be used when drawing shapes (for example, a pie) using that style. You can also use the ShapeFillColor to specify the fill color for shape drawing.
Create and set up another style for the second circle: PieStyle2. As with the first style, we specify the shape line color and width and the fill color.
Private Sub GenerateDoc()
Dim PieStyle1 As New C1.C1PrintDocument.C1DocStyle(Me.C1PrintDocument1)
PieStyle1.ShapeLine = New C1.C1PrintDocument.LineDef(Color.Orchid, 3)
PieStyle1.ShapeFillColor = Color.AliceBlue
Dim PieStyle2 As New C1.C1PrintDocument.C1DocStyle(Me.C1PrintDocument1)
PieStyle2.ShapeLine = New C1.C1PrintDocument.LineDef(Color.DarkOliveGreen, 4)
PieStyle2.ShapeFillColor = Color.LemonChiffon
• C#
private void GenerateDoc()
{
C1.C1PrintDocument.C1DocStyle PieStyle1 = new C1.C1PrintDocument.C1DocStyle(this.c1PrintDocument1);
PieStyle1.ShapeLine = new C1.C1PrintDocument.LineDef(Color.Orchid, 3);
PieStyle1.ShapeFillColor = Color.AliceBlue;
C1.C1PrintDocument.C1DocStyle PieStyle2 = new C1.C1PrintDocument.C1DocStyle(this.c1PrintDocument1);
PieStyle2.ShapeLine = new C1.C1PrintDocument.LineDef(Color.DarkOliveGreen, 4);
PieStyle2.ShapeFillColor = Color.LemonChiffon;
5. We will draw the circles using the RenderDirectPie method. That method has several overloads allowing many parameters (see the reference for details). We will use the version of the method that allows specifying the coordinates, start/sweep angles, and the style for the pie. In this step, we will set up the values for those parameters (the linear lengths are specified in pixels, as we changed the default units of the document to pixels in step 2) (note the use of BodyAreaSize property to adjust the size of the circles depending on the current page size):
Me.C1PrintDocument1.StartDoc()
Dim x_coordinate, y_coordinate As Double
Dim Width, Height As Double
Dim StartAngle, SweepAngle As Single
x_coordinate = Me.C1PrintDocument1.BodyAreaSize.Width / 2
y_coordinate = Me.C1PrintDocument1.BodyAreaSize.Height / 2
StartAngle = 360
SweepAngle = 360
Width = x_coordinate - 100
Height = y_coordinate - 100
• C#
this.c1PrintDocument1.StartDoc();
double x_coordinate, y_coordinate;
double Width, Height;
float StartAngle, SweepAngle;
x_coordinate = this.c1PrintDocument1.BodyAreaSize.Width / 2;
y_coordinate = this.c1PrintDocument1.BodyAreaSize.Height / 2;
StartAngle = 360;
SweepAngle = 360;
Width = x_coordinate - 100;
Height = y_coordinate - 100;
6. Once we have all of the variables declared we can then use the RenderDirectPie method to draw the circles. After you call the RenderDirectPie method for the two circles you can end the document generation by calling the EndDoc method:
Me.C1PrintDocument1.RenderDirectPie(x_coordinate - 200 / 2, y_coordinate - 10 / 2, Width, Height, StartAngle, SweepAngle, PieStyle1)
Me.C1PrintDocument1.RenderDirectPie(x_coordinate / 2, y_coordinate / 2, Width, Height, StartAngle, SweepAngle, PieStyle2)
Me.C1PrintDocument1.EndDoc()
End Sub
• C#
this.c1PrintDocument1.RenderDirectPie(x_coordinate - 200 / 2, y_coordinate - 10 / 2, Width, Height, StartAngle, SweepAngle, PieStyle1);
this.c1PrintDocument1.RenderDirectPie(x_coordinate / 2, y_coordinate / 2, Width, Height, StartAngle, SweepAngle, PieStyle2);
this.c1PrintDocument1.EndDoc();
}
Run the program and observe the following:
Your application should appear like the one below:

|
