By default, the orientation of the C1ProgressBar control is horizontal, meaning that the progress indicator will fill from either the right or the left of the control. However, you can set the progress indicator to fill from the top or the bottom of the control by setting the Orientation property to Vertical. In this topic, you will set the Orientation property in Design view, in Source view, and in code. This topic assumes that you have created an ASP.NET AJAX-Enabled Web site containing a ScriptManager control and a C1ProgressBar control.
Changing the Orientation in Design View
To change the orientation, complete the following steps:
1. Click the Design button to enter Design view.
2. Right-click the C1ProgressBar control to open its context menu and select Properties.
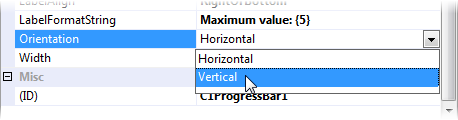
The Properties window opens with the C1ProgressBar control’s properties in focus.
3. In the Properties window, complete the following:
• Set the Orientation property to Vertical.
Note: Setting the Orientation property to Vertical will not reverse the width and height of the control; you will have to do that manually by setting the Width and Height properties.
• Set the Value property to “100”. This will cause the progress indicator to fill the control at run time.
• Set the AnimationDuration property to “6000”. This will lengthen the progress indicator’s fill effect so that you won’t miss it at run time.
4. Press F5 to run the project and observe that the progress indicator starts filling the track starting from the top of the control. You can also have it fill from the bottom of the control by changing the setting of the FillDirection property (see Changing the Progress Indicator Fill Direction).
Changing the Orientation in Source View
To change the orientation, complete the following steps:
1. Click the Source button to enter Source view.
2. Add Orientation=“Vertical” , Value=“100”, and AnimationDuration=”6000” to the <cc1:C1ProgressBar> tag so that the markup resembles the following:
<cc2:C1ProgressBar ID="C1ProgressBar2" runat="server"
Orientation="Vertical" Value="100" AnimationDuration="6000"/>
The other two properties, Value and AnimationDuration, are being set so that you can see the effect of the orientation change at run time. Setting the Value property to 100 will cause the progress indicator to fill, and setting the AnimationDuration property to 6000 will lengthen the animation so that you don’t miss the fill effect.
3. Press F5 to run the project and observe that the progress indicator starts filling the track starting from the top of the control. You can also have it fill from the bottom of the control by changing the setting of the FillDirection property (see Changing the Progress Indicator Fill Direction).
Changing the Orientation in Code
To change the orientation, complete the following steps:
1. On the Visual Studio toolbar, click View | Code to enter Code view.
2. Import the following namespace into your project:
Imports C1.Web.UI.Controls.C1ProgressBar
• C#
using C1.Web.UI.Controls.C1ProgressBar;
3.
Add the following code to the Page_Load event:
‘Set the Orientation property to Vertical
C1ProgressBar1.Orientation = Orientation.Vertical
‘Lengthen the fill effect duration for run-time observance
C1ProgressBar1.AnimationDuration = 6000
‘Specify value so progress indicator will fill at run time
C1ProgressBar1.Value = 100
• C#
//Set the Orientation property to Vertical
C1ProgressBar1.Orientation = Orientation.Vertical;
//Lengthen the fill effect duration for run-time observance
C1ProgressBar1.AnimationDuration = 6000;
//Specify value so progress indicator will fill at run time
C1ProgressBar1.Value = 100;
4. Press F5 to run the project and observe that the progress indicator starts filling the track starting from the top of the control. You can also have it fill from the bottom of the control by changing the setting of the FillDirection property (see Changing the Progress Indicator Fill Direction).
|