The sample designer consists of a single form with the following main components:
|
Control |
Control Name |
Description |
|
ListBox |
_list |
ListBox control with a list of reports currently loaded. |
|
C1PrintPreview |
_c1ppv |
C1PrintPreview control for previewing the reports. |
|
C1ReportDesigner |
_c1rd |
C1ReportDesigner control for designing and editing reports. |
|
PropertyGrid |
_ppg |
PropertyGrid control for editing properties of objects selected in the designer. |
|
ToolBar |
_tb |
ToolBar control with buttons for each command. |
|
C1Report |
_c1r |
C1Report component used for rendering reports into the _c1ppv control. |
For steps on adding the C1ReportDesigner control to the form, see Adding the C1ReportDesigner Component to a Project.
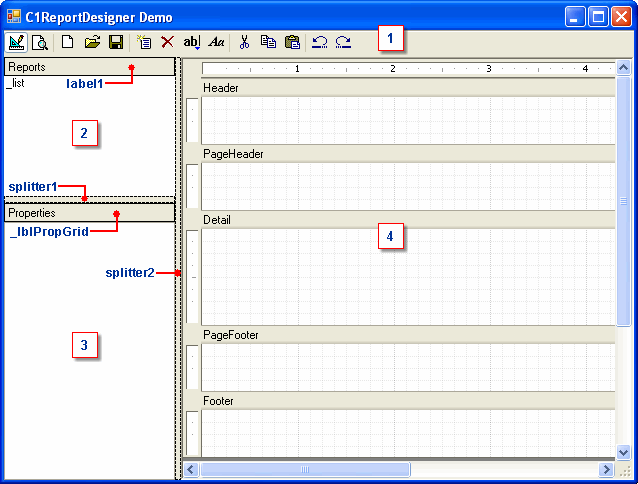
The form contains a few other controls such as labels and splitters, which are used to improve the layout. Notice that the controls are numbered and the labels and splitters are named in the image below. Here's what the form should look like:

Refer to the labels on the form to locate the following controls:
• ![]() The ToolBar
control _tb appears along the top of the form.
The ToolBar
control _tb appears along the top of the form.
• ![]() The report list
_list appears to the left above the property grid _ppg.
The report list
_list appears to the left above the property grid _ppg.
• ![]() The property grid
_ppg.
The property grid
_ppg.
• ![]() On the right, the C1ReportDesigner
control _c1rd fills the client area of the form.
On the right, the C1ReportDesigner
control _c1rd fills the client area of the form.
• The preview control _c1ppv is invisible in design mode. In preview mode, it becomes visible and hides the report designer.
In this sample designer, the toolbar contains 18 items (14 buttons and 4 separators). If you are creating the project from scratch, don't worry about the images at this point. Just add the items to the _tb control (which can easily be done using the ToolBarButton Collection Editor) and set their names as each command is implemented.
|
