To add a ToolTip to display text when you hover over the splitter, simply set Tooltip property. In this topic, you will learn how to set the Tooltip property in Design view, in Source view, and in code.
For more information on ToolTips, see Splitter Bar ToolTip.
In Design View
Complete the following steps:
1. Add a C1Splitter control to your Web form.
2. Right-click the C1Splitter control to open its context menu, then select Properties.
The Properties window appears with C1Splitter's property list in focus.
3. In the Properties window, expand the Bar node.
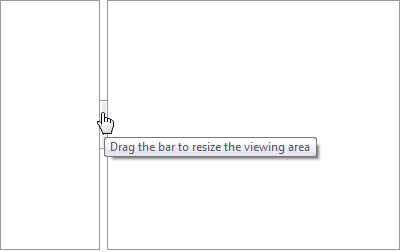
4. Locate the Tooltip property and enter "Drag the bar to resize the viewing area" into its text box.
5. Save and run the project.
In Source View
To add a ToolTip to the splitter bar, place ToolTip="Drag the bar to resize the viewing area" within the <cc1:C1Splitter>tag. Once the Tooltip property has been set, the markup will resemble the following:
<cc1:C1Splitter ID="C1Splitter1" runat="server" Height="212px" Orientation="Vertical"
ToolTip="Drag the bar to resize the viewing area" Width="221px">
In Code
Complete the following steps:
1. Import the following namespace into your project:
Imports C1.Web.UI.Controls.C1Splitter
• C#
using C1.Web.UI.Controls.C1Splitter;
2. Add the following code, which sets the ToolTip property, to the Page_Load event:
C1Splitter1.ToolTip = "Drag the bar to resize the viewing area"
• C#
C1Splitter1.ToolTip = "Drag the bar to resize the viewing area";
3. Run the program.
![]() This Topic Illustrates
the Following:
This Topic Illustrates
the Following:
After you've built the project, hover over the splitter bar and observe that a ToolTip has been added to the splitter bar. The result will resemble the following image:
|