We’ll begin by creating a new windows form project in Visual Studio.
1. In Visual Studio, choose File | New | Project.
2. Select the Silverlight Application template and click OK.
3. In the New Silverlight Application dialog box, select the Enable WCF RIA Services checkbox and click OK. The wizard will create two projects: one is a Silverlight project (client) and the other is a Web project (server).
Next, add an Entity Data Model based on the Northwind database. This model will provide the data for the entire application:
1. In the Solution Explorer, right-click the Web project name and select Add | New Item.
2. In the Data category, select the ADO.NET Data Model item and then click Add.
3. Select Generatefrom database and click Next.
4. Create a connection string pointing to the Northwind SQL Server database and click Next. In this example, you will use "NORTHWND.mdf", which should be installed in the Samples\Data folder.
5. Select the Tables node and click Finish.
6. Build the project so the new Entity Data Model classes are generated and become available throughout the project.
Now we'll add a Domain Service Class to the Web project.
1. Right-click the Web project in the Solution Explorer and select Add | New Item.
2. In the Web category, select DomainServiceClass and click Add.
3. In the Add New Domain Service Class dialog box, make sure that the Entity Data Model that you just created is selected as the available DataContext class. If it is not available, go back and build the solution.
4. Check the entity types (tables) you want to use on the client and click OK.
5. Build the solution. This will add the domain service class to both the Web and the client projects. To see it in the client project, select the client Silverlight project in the Solution Explorer and click ShowAllFiles on the Solution Explorer toolbar. The domain service code is in the Generated_Code folder.
Next, add a C1DataSource component to the application and connect it to the Entity Data Model:
1. Drag a C1DataSource component from the Toolbox onto the form. This is a non-visual component, so it can be placed anywhere within the form's inner content.
2. Select the new component and choose View | Properties Window.
3. In the Properties window, set the DomainContextTypeName property to the type of DomainContext context you want to use. In this case, there should be only one option in the drop-down list, something similar to MyApplication.Web.DomainService1.
At this point, the C1DataSource has created an application-wide object (an EntityDataCache) that represents the Northwind database and has application scope. Additional C1DataSource objects on other forms will share that same object. As long as they are part of the same application, all C1DataSource objects share the same DomainContext.
This unified object context is one of the main advantages SEF provides. Without it, you would have to create multiple object contexts throughout the application, and each would have to be synchronized with the others and with the underlying database separately. This would be a non-trivial task, and any errors could compromise the integrity of the data. The unified object context handles that for you transparently. It efficiently caches data and makes it available to all views in a safe, consistent way.
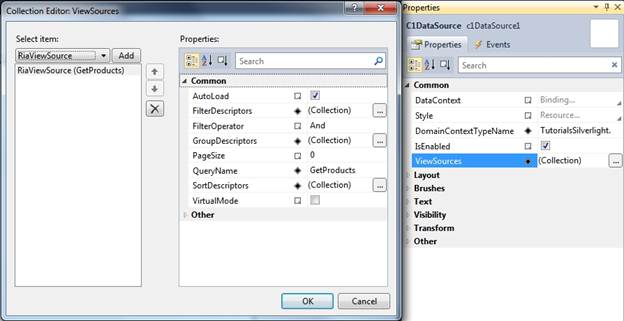
Now that our C1DataSource has a DomainContext to work with, we will go on to specify the entity sets it will expose to the application through its ViewSources collection. Note that if you are familiar with ADO.NET, you can think of the C1DataSource as a DataSet and the ViewSources collection as DataView objects.
In the properties of the C1DataSource, locate the ViewSourcesCollection property and open the collection editor. Click Add and then select GetProducts from the QueryName drop-down list.
Names of the entity sets correspond to the names of the query methods defined in your domain service class. If you don’t like the name, you can rename it by setting the NameOverride property of the view source. For example, if you don’t like the "Get" prefix, you can set NameOverride=Products. It will still use the GetProducts query method to get data, only the view source name will change.
For this simple example, the GetProducts entity is all that's necessary. In other situations, like in master-detail scenarios, you can add more than one entity set. Note that you don’t have to define all entity sets in one C1DataSource. You can have a separate C1DataSource for each ViewSource that you need. However, you must ensure that the C1DataSource components that you use utilize the same DomainContextType.
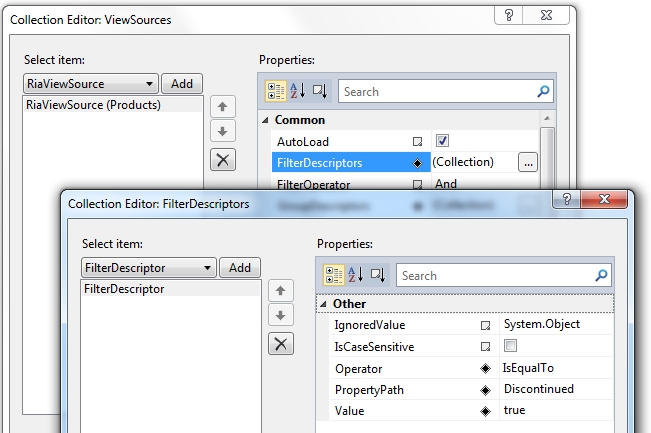
In reality we’ll only want to bring a small subsection of the data contained within our database back to the client at any one time. This avoids overloading the client and network and also ensures that we are only presenting data that is relevant to the task our end user is engaged in. The traditional approach to this has been to create code (typically SQL queries) that we would run against the database to achieve our desired results. With C1DataSource, we can make use of the designer surface to achieve our goal without the need to write code by specifying server-side filters as property settings.
From the ViewSourceCollection editor, open the FilterDescriptor collection editor, add a filter descriptor and type the property name and a value for it for server-side filtering. If you need to filter more than one property, you can add additional filter descriptors.
Using exactly the same methodology, you can add SortDescriptors and GroupDescriptors to specify sorting and grouping of the data.
With our C1DataSource configured, add a grid control to the designer window. This can be a Microsoft DataGrid, a ComponentOne FlexGrid, or any other grid control you like to work with. Once the grid control is on the designer surface, specify a binding for its ItemsSource property in XAML:
ItemsSource="{Binding [GetProducts], ElementName=c1DataSource1}"
If you renamed the entity set to Products (by setting its NameOverride property), this will be
ItemsSource="{Binding [Products], ElementName=c1DataSource1}"
At this point, you need to either specify columns of the grid in the designer or set the grid’s AutoGenerateColumns property to True; otherwise, the grid will not have any columns at run time. In real applications, you will probably specify columns in the designer, but for this example, we’ll set AutoGenerateColumns = True.
Now run the project. Notice that the data loads automatically, and you can sort and modify data as you would expect. All this has been achieved by adding just two items to your form (a C1DatSource and a data grid) and setting a few properties. You did not have to write a single line of code!
You could continue to add more controls to this form and bind them to specific items in the Products or other collection. To illustrate this point, add a TextBox control to the form and bind its Text property to the ProductName in XAML:
in XAML:
Text="{Binding [GetProducts].ProductName, ElementName=c1DataSource1}"
Save, build and run the application again, and this time notice how the name of the product currently selected in the grid appears in the TextBox that you have just added to the form. If you then edit the product name in either control, the change will be immediately reflected in the other.