Traditional WinForms Implementation
Our sample application will consist of the following elements:
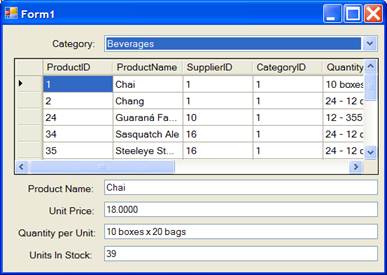
•A ComboBox listing the NorthWind product categories.
•A DataGridView showing all products for the currently selected category.
•Some TextBox controls bound to properties of the currently selected product.
This is what the final application will look like:
The basic implementation is simple, since Visual Studio handles most of the data binding related tasks automatically. In fact, the entire application can be written without a single line of code.
Here are the steps:
1. Create a new WinForms application
2. Use the Data | Add New DataSource menu and add a reference to the NORTHWND.MDF database. Accept all the default options offered by the wizard, and pick all the tables in the database.
3. Add the controls to the form as shown on the image above: one ComboBox, one DataGridView, four TextBox controls, and a few Label controls.
At this point, the application has access to the data and it has controls to show and edit the data. To connect the controls to the data, follow these steps:
1. Add a new BindingSource component to the form
2. Select the new BindingSource component, select its DataSource property in the property window, and use the drop-down editor to select the NORTHWINDDataSet data set.
3. Still with the BindingSource component selected, use the drop-down editor set the DataMember property to “Categories”.
The final step is to select each data bound control and bind it to the BindingSource component:
For the ComboBox, set the following properties:
DataSource
bindingSource1
DisplayMember
CategoryName
ValueMember CategoryID
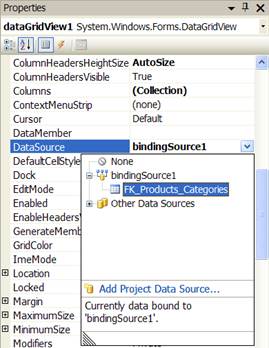
For the DataGridView, use the drop-down editor in
the property grid to set the DataSource property to
FK_Products_Categories, the item that appears under bindingSource1 and
represents the products under the currently selected category. The image below
shows what the drop-down editor looks like just before the selection is made:
Finally, select each of the TextBox controls and use the
drop-down editor in the property window to bind the Text property to the
corresponding element in the currently selected product. For example:
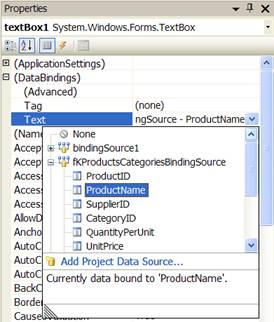
Repeat this step to bind the other TextBox controls to the UnitPrice, QuantityPerUnit, and UnitsInStock fields.
The application is now ready. Run it and notice the following:
•When you select a category from the ComboBox, the corresponding products are displayed on the grid below, and the product details appear in the TextBox controls.
•When you select a product on the grid, the product details are automatically updated.
•The values shown on the grid and in the text boxes are synchronized. If you change the values in one place, they also change in the other.
•If you change the value of a product’s CategoryID in the grid, the product no longer belongs to the currently selected category and is automatically removed from the grid.
This is the traditional way of doing data binding in WinForms. Visual Studio provides rich design-time support and tools that make it easy to get applications started. Of course, real applications typically require you to add some code to implement specific logic.