While TabControl for ASP.NET AJAX comes with five built-in styles, we recognize that there are instances where that you will want to customize your C1TabControl control. To customize the C1TabControl control, you will create a custom CSS style sheet and add it to your project as a visual style. The custom CSS style sheet must always be named "styles.css".
![]() Tip: The easiest way to create a custom visual style is
by modifying one of the control's pre-existing visual styles. You can find the
.css sheets and images for C1TabControl's visual styles within the installation directory
at C:\Program Files\ComponentOne\Studio for ASP.NET
AJAX\C1WebUI\VisualStyles.
Tip: The easiest way to create a custom visual style is
by modifying one of the control's pre-existing visual styles. You can find the
.css sheets and images for C1TabControl's visual styles within the installation directory
at C:\Program Files\ComponentOne\Studio for ASP.NET
AJAX\C1WebUI\VisualStyles.
Before you add your .css file and images, you will have to create a hierarchy of folders, the last of which will hold your files. On the top-level of your project, create a folder named "VisualStyles". Underneath the VisualStyles folder, create a sub-folder bearing the theme name (such as "CustomStyle"), and then, beneath that, create a sub-folder named "C1TabControl". The image folder and .css file should be placed underneath the C1TabControl folder. The result will resemble the following:
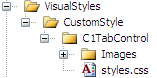
This structure of these folders is very important; C1TabControl will always look for the ~/VisualStyles/StyleName/C1TabControl/styles.css path, as it is the default visual style path for the control.
Once the .css file and image are in place, set the VisualStylePath property to the path of the first folder (~/VisualStyles), set the UseEmbeddedVisualStyles property to False, and then set the VisualStyle property to the custom theme name.
You can create a visual style from scratch, but the simplest way to create a custom style sheet is to modify one of the control's pre-existing CSS styles. The sample below reveals the CSS code that was used to make C1TabControl's ArcticFox visual style:
C1TabControl ArcticFox CSS Styles ![]()
/* =========== ArcticFox C1TabControl =========================================== */
.C1TabControl_ArcticFox_C1Top .C1TabStrip_ArcticFox .level1,
.C1TabControl_ArcticFox_C1Bottom .C1TabStrip_ArcticFox .level1
{
width:auto;
margin-right:-2px;
}
.C1TabControl_ArcticFox .C1MultiPage_ArcticFox .C1Container
{
height:100%;
}
.C1TabControl_ArcticFox_C1Top .C1MultiPage_ArcticFox
{
width:100%;
height:100%;
margin-top:-1px;
float:left;
}
.C1TabControl_ArcticFox_C1Bottom .C1MultiPage_ArcticFox
{
width:100%;
height:100%;
margin-bottom:1px !important;
margin-bottom:-1px;
}
.C1TabControl_ArcticFox_C1Left .C1MultiPage_ArcticFox,
.C1TabControl_ArcticFox_C1Right .C1MultiPage_ArcticFox
{
width:100%;
height:100%;
}
.C1TabControl_ArcticFox_C1Left .C1StripCell,
.C1TabControl_ArcticFox_C1Right .C1StripCell
{
min-width:100px;
width:auto !important;
width:100px;
padding:0;
margin:0;
vertical-align:top;
}
.C1TabControl_ArcticFox_C1Left .C1StripCell
{
float:left;
}
.C1TabControl_ArcticFox_C1Right .C1StripCell
{
float:left;
clear:right;
}
.C1TabControl_ArcticFox_C1Left .C1PageCell
{
height:100%;
margin-left:-1px;
vertical-align:top;
float:left;
clear:right;
}
.C1TabControl_ArcticFox_C1Right .C1PageCell
{
height:100%;
margin-right:1px !important;
margin-right:-1px;
vertical-align:top;
float:left;
}
Please note that C1TabControl inherits some of its styling from a C1TabStrip control visual style, thus you will also have to add CSS styles for C1TabStrip to the styles.css file. The sample below reveals the CSS code that was used to make C1TabStrip's ArcticFox visual style:
/* =========== ArcticFox C1TabStrip =========================================== */
.C1TabStrip_ArcticFox .C1List
{
margin:0;
padding:0;
display:block;
}
.C1TabStrip_ArcticFox_C1Top .C1List,
.C1TabStrip_ArcticFox_C1Bottom .C1List
{
float:left;
}
.C1TabStrip_ArcticFox_C1Left .C1List,
.C1TabStrip_ArcticFox_C1Right .C1List
{
width:100px;
}
.C1TabStrip_ArcticFox .C1ListItem .C1Link
{
color:#000000;
text-decoration:none;
display:block;
background: #C6C6C6 url(Images/arcticfox_horiz_bg1.gif) repeat-x top left;
margin:0;
padding:.5em;
cursor:pointer;
}
.C1TabStrip_ArcticFox_C1Top .C1ListItem
{
border-top:solid 1px #999;
border-right:solid 1px #999;
}
.C1TabStrip_ArcticFox_C1Bottom .C1ListItem
{
border-bottom:solid 1px #999;
border-right:solid 1px #999;
}
.C1TabStrip_ArcticFox_C1Left .C1ListItem,
.C1TabStrip_ArcticFox_C1Right .C1ListItem
{
border-top:solid 1px #999;
border-left:solid 1px #999;
}
.C1TabStrip_ArcticFox_C1Top .C1ListItem .C1Link,
.C1TabStrip_ArcticFox_C1Bottom .C1ListItem .C1Link,
.C1TabStrip_ArcticFox_C1Left .C1ListItem .C1Link,
.C1TabStrip_ArcticFox_C1Right .C1ListItem .C1Link
{
border: solid 1px #fff;
}
.C1TabStrip_ArcticFox .C1ListItem .C1Link:hover
{
background: #666 url(Images/arcticfox_header_bg.gif) repeat-x top left;
}
.C1TabStrip_ArcticFox .C1ListItem .C1Selected
{
background: #ffffff url(Images/arcticfox_horiz_bg1_hot.gif) repeat-x top left;
}
.C1TabStrip_ArcticFox_C1Top .C1FirstItem .C1Link,
.C1TabStrip_ArcticFox_C1Bottom .C1FirstItem .C1Link
{
border-left:solid 1px #999;
}
.C1TabStrip_ArcticFox_C1Left .C1LastItem .C1Link,
.C1TabStrip_ArcticFox_C1Right .C1LastItem .C1Link
{
border-bottom:solid 1px #999;
}
.C1TabStrip_ArcticFox_C1Top .C1Inner,
.C1TabStrip_ArcticFox_C1Bottom .C1Inner
{
display:block;
text-align:center;
}
.C1TabStrip_ArcticFox_C1Left .C1Inner,
.C1TabStrip_ArcticFox_C1Right .C1Inner
{
display:block;
text-align:left;
white-space:nowrap;
overflow:hidden;
text-overflow:ellipsis;
}
Since C1TabControl uses two separate visual styles, you can mix and match different CSS visual styles for a unique look. For example, you can use the C1TabStrip ArcticFox style with the C1TabControl Office2007Black style.
For step-by-step instructions on adding custom style sheets to your project, see Adding Custom Visual Styles.
|