In the last step, you customized the C1DateTimePicker control. In this step, you will run the project and observe some of the run-time features of the control.
Complete the following steps:
1. From the toolbar menu, select Project | Run Project to run your application. Observe that the video content plays automatically and that the application resembles the following:
![]()
2. Using your cursor, highlight an area in the date picker. The selection resembles the following:
![]()
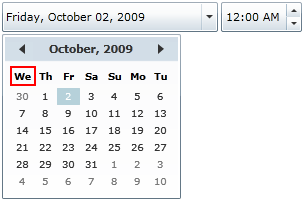
3. Click the time picker drop-down arrow to reveal the calendar and observe that the calendar's weeks start with Wednesday:
Congratulations! You have completed the C1DateTimePicker quick start. In this quick start, you created a WPF application containing a C1DateTimePicker control, modified the control's appearance, Now that you have finished the quick start, we recommend that you visit the Working with C1DateTimePicker or C1DateTimePicker Task-Based Help topics.
|