To create a custom visual style for the C1Upload control based on the Arctic visual style, complete the following:
1. Copy the theme folder C:\Program Files\ComponentOne\Studio for ASP.NET\C1WebUI\VisualStyles\ArcticFox\C1Upload to a new folder in your Visual Studio project. ~/VisualStyles/ArcticFoxNew/.
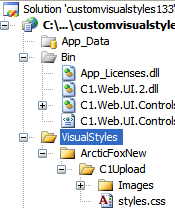
2. Open the styles.css file inside the new folder, rename all the class names to make sure they end with the new visual style name “ArcticFoxNew”.
3. Replace all instances of _ArcticFox with _ArcticFoxNew.
Suppose the original class name is .C1Upload_ArcticFox, then rename it to .C1Upload_ArcticFoxNew.
4. Save the modified .css file.
5. Save and close your Visual Studio project.
6. Reopen your Visual Studio project.
7. Set the VisualStylePath property to ~/VisualStyles.
8. Set the UseEmbeddedVisualStyles property to False.
9. Set the VisualStyle property to the new external custom theme, ArcticFoxNew (external).
10. Now you can open the new styles.css file and edit the corresponding CSS classes. In this example, we modify the border color and border width for the file name row. Change the value of the border’s width and color like the following:
.C1Upload_ArcticFoxNew .C1FileRow
{
border:solid 2px #FF0000;
}
11. Change the text color that appears in the file name box to orange to match the same color we used for the border. Locate the C1Upload_ArcticFoxNew .C1FileName selector and change the value of the color property for the text.
C1Upload_ArcticFoxNew .C1FileName
{
color:#FF0000;
}
12. Change the text color for the Add File, Upload, and Cancel buttons to #FF0000. Locate the .C1Upload_ArcticFoxNew .C1Button, .C1Upload_ArcticFoxNew .C1Button:link, .C1Upload_ArcticFoxNew .C1Button:active, .C1Upload_ArcticFoxNew .C1Button:visited, .C1Upload_ArcticFoxNew .C1Button:hover selector and change the value of the color property for the button’s text like the following:
.C1Upload_ArcticFoxNew .C1Button,
.C1Upload_ArcticFoxNew .C1Button:link,
.C1Upload_ArcticFoxNew .C1Button:active,
.C1Upload_ArcticFoxNew .C1Button:visited,
.C1Upload_ArcticFoxNew .C1Button:hover
{
color:#FF0000;
}
13. Rebuild your project and observe the new visual style changes to C1Upload.
![]() This task illustrates the following
This task illustrates the following
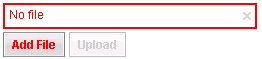
The following image shows how the upload control appears after you run the program:
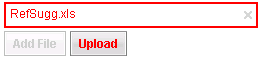
The following image shows how the upload appears after you run the program and add a file to the C1Upload control. Notice how the new CSS styles apply to the active Upload button.
|