To bind the XML elements and set their properties in the Bindings Collection Editor for the C1WebTreeView, complete the following steps:
1. Right-click the C1WebTreeView control and select Edit Bindings from its context menu. The Bindings Collection Editor appears.
2. Select File from the list and click Add. The File item is added to the binding list and the binding properties. Set the File item Text property to "Nvidia" and PopulateOnDemand to True. The text, Nvidia, appears as a node on the tree view. Enabling the PopulateOnDemand property enables File items to load to the sever using a callback rather than a postback when you click on the item at run-time.
3. Select PROFILESET from the list and click Add. The PROFILESET item is added to the binding list and the binding properties. Set the PROFILESET item CommandNameField property to #Name, Text property to "Profiles" and PopulateOnDemand to True. The item Profiles appears beneath the Nvidia node.This enables the PROFILESET items to load to the sever using a callback rather than a postback when you click on the item at run-time.
4. Select PROFILE from the list and click Add. The PROFILE item is added to the binding list and the binding properties. Set the PROFILE item CommandNameField property to Label, Textfield property to "Label" and PopulateOnDemand to True. The value of each Label attribute for the Profile element appears beneath the Profiles node.This enables the PROFILE items to load to the sever using a callback rather than a postback when you click on the item at run-time.
5. Select APPLICATION from the list and click Add. The APPLICATION item is added to the binding list and the binding properties. Set the APPLICATION item's CommandNameField property to Label and Textfield property to "Label". The value of each Label for the Application element appears beneath each Profile item. Since this item will not have and child elements we don't need to set the PopulateOnDemand property to True because there is no items to populate to the server.
6. Select PROPERTY from the list and click Add. The PROPERTY item is added to the binding list and the binding properties. Set the PROPERTY item's CommandNameField property to Label and Textfield property to "Label".
Run the Program and Observe the following:
Click on the Nvidia node to expand it. The AJAX feature, PopulateOnDemand is triggered.
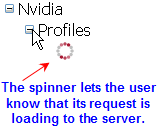
As a visual cue for the user an animated spinner ![]() appears as the items are
loading from the server to the client using callbacks. The animated spinner is
the default value for the CallbackWaitImageUrl.
For more information about how to use the C1WebTreeView.CallbackWaitImageUrl
property see Using Visual Cues
During a Callback.
appears as the items are
loading from the server to the client using callbacks. The animated spinner is
the default value for the CallbackWaitImageUrl.
For more information about how to use the C1WebTreeView.CallbackWaitImageUrl
property see Using Visual Cues
During a Callback.
Notice how callbacks prevent the page from flickering and also notice how quickly the items populate.
Click on the Profiles node to expand it. Again, the PopulateOnDemand is triggered and the default spinner appears.
This concludes the tutorial.
|