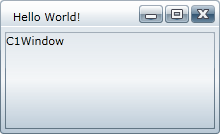
You can easily customize Windows for WPF control's header area by adding a title. For more information the header area, see C1Window Elements. By default the window does not include text in the caption bar, but you can customize this at design time in Microsoft Expression Blend, in XAML, and in code by setting the Header property.
At Design Time in Blend
To set the Header property in Blend, complete the following steps:
1. Click the C1Window control once to select it.
2. Navigate to the Properties tab and locate the Header item.
3. Click in the text box next to the Header item, and enter "Hello World!" or some other text.
This will set the Header property and the text in the caption bar of the dialog window to the text you chose.
In XAML
For example, to set the Header property add Header="Hello World!" to the <c1:C1Window> tag so that it appears similar to the following:
<c1:C1Window Height="110" HorizontalAlignment="Right" Margin="0,54,71,0" VerticalAlignment="Top" Width="220" Content="C1Window" Header="Hello World!"/>
In Code
For example, to set the Header property, add the following code to your project:
Me.C1Window1.Header = "Hello World!"
•C#
this.c1window1.Header = "Hello World!";
Run the application and observe:
The caption bar of the C1Window control will appear with "Hello World!" or the text you chose:
