It's easy to create your first Studio for WinJS project. In this quick start, you'll learn how to add the Radial Gauge for WinJS control to an HTML project. You'll create a new JavaScript project and add a reference to the C1 Wijmo UI WinJS extension, add the Radial Gauge, and customize the gauge.
Complete the following steps:
1. Open Visual Studio 2012 in Windows 8 and select File | New | Project.
2. Under Templates select JavaScript to display the appropriate templates.
3. Choose Blank App, enter a name and location, and click OK. The project has been created. After creating a new project, you'll need to add a reference to C1Wijmo.UI (Studio for WinJS) in order to start using the controls.
4. Select Project | Add Reference and select C1 Wijmo UI in the Reference Manager. Click OK to add the reference to the project.
5. Locate the default.html file in your Solution Explorer and click the file to open it.
6. Place your cursor between the two sets of dependencies already included in your project and insert the following:
<script src="///C1Wijmo.UI.1.0/js/jquery-1.8.1.min.js" type="text/javascript"></script>
<script src="///C1Wijmo.UI.1.0/js/jquery-ui-1.8.23.custom.min.js" type="text/javascript"></script>
<script src="///C1Wijmo.UI.1.0/js/c1.ui.js" type="text/javascript"></script>
<script src="///C1Wijmo.UI.1.0/js/wijwrapper.js" type="text/javascript"></script>
<link href="///C1Wijmo.UI.1.0/themes/metro/jquery-wijmo.css" rel="stylesheet" type="text/css">
<link href="///C1Wijmo.UI.1.0/css/c1.ui.css" rel="stylesheet" type="text/css">
7. Locate the markup within the <body> tags of your project and replace it with the following. This new markup sets many of the radial gauge options:
<div id="gauge" data-win-control="C1.UI.Gauge.RadialGauge"></div>
8. Insert the following script within the <head> tags to initialize your widget:
<script type="text/javascript">
function ready(element, options) {
var gauge = document.getElementById("gauge").winControl;
}
</script>
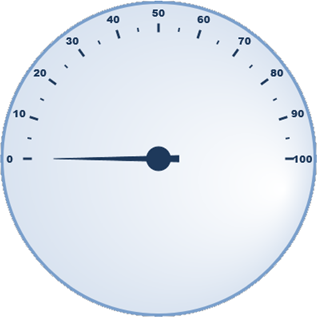
If you run your application now, you'll see a radial gauge that resembles the following image:
Note that this is a very basic gauge – you can easily customize the appearance and behavior of the grid with options.
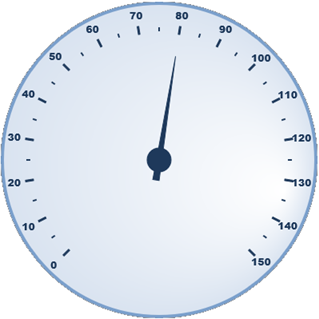
9. Add markup to the <div id="gauge> tag so it resembles the following:
<div id="gauge" data-win-control="C1.UI.Gauge.RadialGauge" data-win-options="{max:150, startAngle:-45, sweepAngle:270, value:80}"></div>
The WinJS Framework will look at the data-win-control attribute and automatically cast this markup as a control. Additionally, the data-win-options attribute is used to parse properties of the control. This markup sets the maximum value, the start and sweep angles, and the current value of the gauge. If you run the application now, you'll see that the gauge will now resemble the following image:
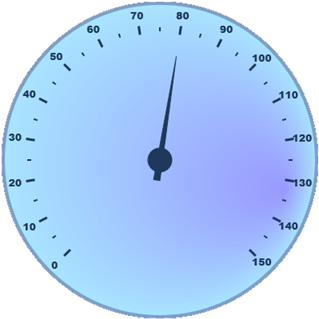
10. Add additional markup to the <div id="gauge> tag so it resembles the following:
<div id="gauge" data-win-control="C1.UI.Gauge.RadialGauge" data-win-options="{max:150, startAngle:-45, sweepAngle:270, value:80, face:{type:C1.UI.Gauge.GaugeFace, style:{type:C1.UI.Chart.ChartStyle, fill:'r(0.9, 0.60)#9999FF-#A8E4FF'}}}"></div>
This new markup changes the color of the gauge's face. If you run the application now, you'll see that the gauge will now resemble the following image:
Note that you can use Blend to customize the appearance of the controls. Studio for WinJS includes support so you get property setting for each control when working with them in Blend. This comes in handy when you are trying to find a property or want to see the result of changing it.
Congratulations, you've now completed the Quick Start and learned how to work with Radial Gauge for WinJS.