In this step, you will customize the Appointment dialog box by creating your own template based on the default EditAppointmentTemplate.
Custom resources, such as the customized EditAppointmentTemplate you are going to create, should be added as merged dictionaries in the App.xaml file that is automatically created in a new project. This allows them to be easily accessed in the project. In this step, you will also edit the App.xaml file to include your custom template so you can use it in your project.
To edit a copy of the EditAppointmentTemplate in Blend:
1. First, you will need a copy of the default EditAppointmentTemplate.xaml template and the CommonDialogResources.xaml template installed with Scheduler for WPF. They are installed in C:\Program Files\ComponentOne\Studio for WPF\C1Schedule\XAML\themes by default.
2. Place the template copies in your project folder and rename the EditAppointmentTemplate.xaml to myEditAppointmentTemplate.xaml.
3. Add the templates to your Blend project:
a. Select Project | Add Existing Item.
b. Browse to find myEditAppointmentTemplate.xaml and click Open.
c. Repeat these steps to add the CommonDialogResources.xaml to your project.
4. Double-click CommonDialogResources.xaml in the Project panel and update the c1sched namespace so it looks like the following:
xmlns:c1sched="clr-namespace:C1.WPF.C1Schedule;assembly=C1.WPF.C1Schedule"
5. Now change the reference to the C1Scheduler resource:
a. Select Edit | Replace and enter Source="/C1.WPF.C1Schedule; in the Find what text box.
b. Enter Source="pack://application:,,,/C1.WPF.C1Schedule; in the Replace with text box and click Replace. There is only one instance that must be changed.
c. Save and close the CommonDialogResources.xaml file.
6. Double-click myEditAppointmentTemplate.xaml in the Project panel and update the c1sched and storage namespaces so they look like the following:
xmlns:c1sched="http://schemas.componentone.com/wpf/C1Schedule"
xmlns:storage="clr-namespace:C1.C1Schedule;assembly=C1.WPF.C1Schedule"
7. Find the EditAppointmentTemplate definition in the file. It looks like the following:
<DataTemplate x:Key="{ComponentResourceKey
TypeInTargetAssembly={x:Type local:C1Scheduler}, ResourceId=EditAppointmentTemplate}">
8. Change the Key to:
<DataTemplate x:Key="myEditAppointmentTemplate">
9. Change the references to C1Scheduler resources:
a. Find the reference to the CommonDialogResources.xaml in the <ResourceDictionary.MergedDictionaries> tag, and change it to the following:
<ResourceDictionary Source="CommonDialogResources.xaml" />
b. Select Edit | Replace and enter Source="/C1.WPF.C1Schedule; in the Find what text box.
c. Enter Source="pack://application:,,,/C1.WPF.C1Schedule; in the Replace with text box and click Replace All.
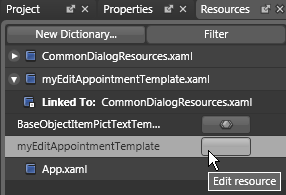
10. In the Resources panel of Blend, expand the node next to myEditAppointmentTemplate.xaml, and click the Edit Resource button next to myEditAppointmentTemplate.
The Appointment dialog box appears in the Design view of Blend, and you can customize it as you wish.
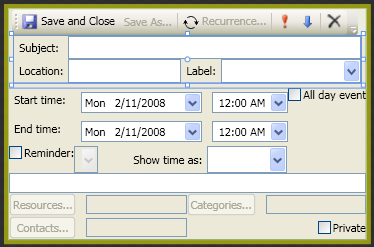
Let's remove the High and Low Importance buttons as an example.
11. In the Objects and Timeline panel, expand the [ToolBar] node under [ToolBarTray], right-click the highImportance node and select Delete.
12. Right-click the lowImportance node and select Delete. Now you must tell C1Scheduler to use your custom template.
13. Save and close myEditAppointmentTemplate.xaml.
To add myEditAppointmentTemplate.xaml to the MergedDictionaries:
1. Double-click App.xaml in the Project panel.
2. Add the following XAML within the Application.Resources tags so it looks like this:
<ResourceDictionary>
<ResourceDictionary.MergedDictionaries>
<ResourceDictionary Source="myEditAppointmentTemplate.xaml" />
</ResourceDictionary.MergedDictionaries>
</ResourceDictionary>
3. Save and close App.xaml.
To use your customized template:
1. Double-click Page1.xaml in the Project panel.
2. Select the C1Scheduler control on your page and expand the View node in the Properties panel.
3. Click the Show Advanced Properties arrow to view the Template properties.
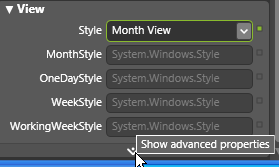
4. Next to the EditAppointmentTemplate property, click the Advanced property options button, select Local Resource, and click myEditAppointmentTemplate.
|