This tutorial shows how you can serialize objects in compressed files, and then load them back into the memory.
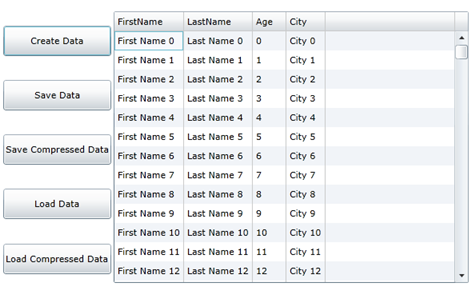
The sample creates a data table of people. The table is saved (serialized) into regular and compressed streams. Finally, the data is loaded back from either stream. Here is what the final application will look like:
Step 1: Create the main form.
Start a new Silverlight project in Visual Studio and from the Toolbox, add the following controls to the form:
•Five Button controls along the left edge of the form, as shown in the picture above. In the Properties window, make the following changes to each Button control:
|
Button |
Button.Content Property |
Button.Name Property |
Button.IsEnabled Property |
|
1 |
Create Data |
btnCreate |
True (Default) |
|
2 |
Save Data |
btnSave |
True |
|
3 |
Save Compressed Data |
btnSaveCompressed |
True |
|
4 |
Load Data |
btnLoad |
True |
|
5 |
Load Compressed Data |
btnLoadCompressed |
True |
Note that the save and load buttons cannot be used until the data table has been created or saved.
•A DataGrid control on the right of the form.
Step 2: Add references and Imports/using statements.
Go to the Solution Explorer window and click the Show All Files button. Right-click on References, and select the Add Reference menu option. Select the C1.Silverlight.Zip assembly from the list, or browse to find the C1.Silverlight.Zip.dll file.
Select the MainPage.xaml.vb tab (MainPage.xaml.cs in C#) or go to View|Code to open the Code Editor. At the top of the file, add the following statements:
Imports System.IO
Imports System.Runtime.Serialization
Imports C1.C1Zip
•C#
using System.IO;
using System.Runtime.Serialization;
using C1.C1Zip;
This declares the namespaces of the classes used in the project.
Step 3: Declare constants.
In the Code Editor of the page, type or copy the following lines in the body of the page implementation:
•C#
public partial class MainPage : UserControl
{
PersonList personList = new PersonList();
This constant defines the list of people that will appear in the grid.
Step 4: Add code to create the data table.
Add the following code to handle the Click event for the Create Data Table button:
•C#
private void btnCreate_Click(object sender, RoutedEventArgs e)
{
for (int i = 0; i < 1000; i++)
{
personList.Persons.Add(new Person()
{
FirstName = string.Format("First Name {0}", i),
LastName = string.Format("Last Name {0}", i),
Age = i,
City = string.Format("City {0}", i)
});
}
this.dataGrid1.ItemsSource = personList.Persons;
}
The function uses standard ADO.NET objects and methods to create and populate a DataTable object, which is then bound to the DataGrid control.
Step 5: Add code to save the data table.
Add the following code to handle the Click event for the Save Data Table button:
•C#
private void btnSave_Click(object sender, RoutedEventArgs e)
{
SaveFileDialog dlgSaveFile = new SaveFileDialog();
if (dlgSaveFile.ShowDialog() == true)
{
Stream stream = dlgSaveFile.OpenFile();
DataContractSerializer dcs = new DataContractSerializer(typeof(PersonList));
dcs.WriteObject(stream, personList);
stream.Close();
}
}
The first set of code serializes the DataTable into a regular file, and the second serializes the DataTable into a compressed file. Note that only one additional line is required to compress the data.
In both cases, the serialization is executed by the BinaryFormatter object. The only difference is that in the first case, the Serialize method is called with a regular file stream as a parameter; in the second, a C1ZStreamWriter is used instead.
Step 6: Add code to save the compressed data.
Add the following code to handle the Click event for the Save Compressed Data button:
•C#
private void btnSaveCompressed_Click(object sender, RoutedEventArgs e)
{
var dlgSaveFile = new SaveFileDialog();
if (dlgSaveFile.ShowDialog() == true)
{
Stream stream = dlgSaveFile.OpenFile();
//Use C1ZStreamWriter to compress the stream.
C1ZStreamWriter compressor = new C1ZStreamWriter(stream);
DataContractSerializer dcs = new DataContractSerializer(typeof(PersonList));
dcs.WriteObject(compressor, personList);
stream.Close();
}
}
Step 7: Add code to load the data table from the regular file.
Add the following code to handle the Click event for the Load Data Table button:
•C#
private void btnLoad_Click(object sender, RoutedEventArgs e)
{
var dlgOpenFile = new OpenFileDialog();
this.dataGrid1.ItemsSource = null;
if (dlgOpenFile.ShowDialog() == true)
{
Stream stream = dlgOpenFile.File.OpenRead();
DataContractSerializer dcs = new DataContractSerializer(typeof(PersonList));
PersonList pl = (PersonList)dcs.ReadObject(stream);
stream.Close();
this.dataGrid1.ItemsSource = pl.Persons;
}
}
The first main line of code creates a new BinaryFormatter object and the second one calls its Deserialize method. The Deserialize method takes a single parameter: the stream in which the object is defined. In this case, the stream is a regular file stream.
Step 8: Add code to load the data table from the compressed file.
Add the following code to handle the Click event for the Load Compressed Data Table button:
•C#
private void btnLoadCompressed_Click(object sender, RoutedEventArgs e)
{
var dlgOpenFile = new OpenFileDialog();
this.dataGrid1.ItemsSource = null;
if (dlgOpenFile.ShowDialog() == true)
{
Stream stream = dlgOpenFile.File.OpenRead();
DataContractSerializer dcs = new DataContractSerializer(typeof(PersonList));
//Use C1ZStreamReader to uncompress the stream.
C1ZStreamReader compressor = new C1ZStreamReader(stream);
PersonList pl = (PersonList)dcs.ReadObject(compressor);
stream.Close();
this.dataGrid1.ItemsSource = pl.Persons;
}
}
The main lines are similar to the code used to deserialize data from a regular file. The only difference is that instead of passing a regular file stream to the Deserialize method, we now use a C1ZStreamReader object.
This concludes the Compressed Serialization tutorial.